Alpha A9 II - Camera SONY - Free user manual and instructions
Find the device manual for free Alpha A9 II SONY in PDF.
Questions des utilisateurs sur Alpha A9 II SONY
0 question sur cet appareil. Repondez a celles que vous connaissez ou posez la votre.
Poser une nouvelle question sur cet appareil
Download the instructions for your Camera in PDF format for free! Find your manual Alpha A9 II - SONY and take your electronic device back in hand. On this page are published all the documents necessary for the use of your device. Alpha A9 II by SONY.
USER MANUAL Alpha A9 II SONY
https://www.sony.net/ SonyInfo/Support/
SONY.
5-010-473-41(1)
60
α9
E-mount

"Help Guide" (Web manual)
Refer to "Help Guide" for in-depth instructions on many functions of the ca
https://rd1.sony.net/help/llc/1960/h_zz/
| Interchangeable Lens Digital Camera/Instruction Manual | GB |
| Appareil photo à objectif interchangeable/Mode d'emploi FR | |
| Digitalkamera mit Wechselobjektiv/Gebrauchsanleitung DE | |
| Câmara Digital de Lentes Intercambiables/Manual de instructiones | ES |
| Fotocamera digitale con objettivo intercambiabile/Istruzioni per l'uso | IT |
| Câmara Digital de Objetivas intercambiáveis/Manual de instructções | PT |
| Digitaler camera met verwisselbare lens/Gebruiksaanwijzing NL | |
| Aparal cyfrowy z wymiennymi obiektywami/Instrukcja obslugi PL | |
| Límpoboyi fótoanapat co semeNBIM oběktbOM/Vnctpykma no ekplnyatauM | RU |
| Límpoboyi fótoanapat 3 i 3minHMM o6'ckTBOM/IIocIbHK 3 ekplnyatau | UA |
| Digitalkamera med utbytbart objektiv/Handledning SE | |
| Digitalälinen camera vahdettavalla objektivilla/Käytöopas FI | |
| Digitalkamera med utskiftbart objektiv/Bruksanvisning NO | |
| Digitalkamera med udskifeltigt objektiv/Betjeningsvejledning DK |
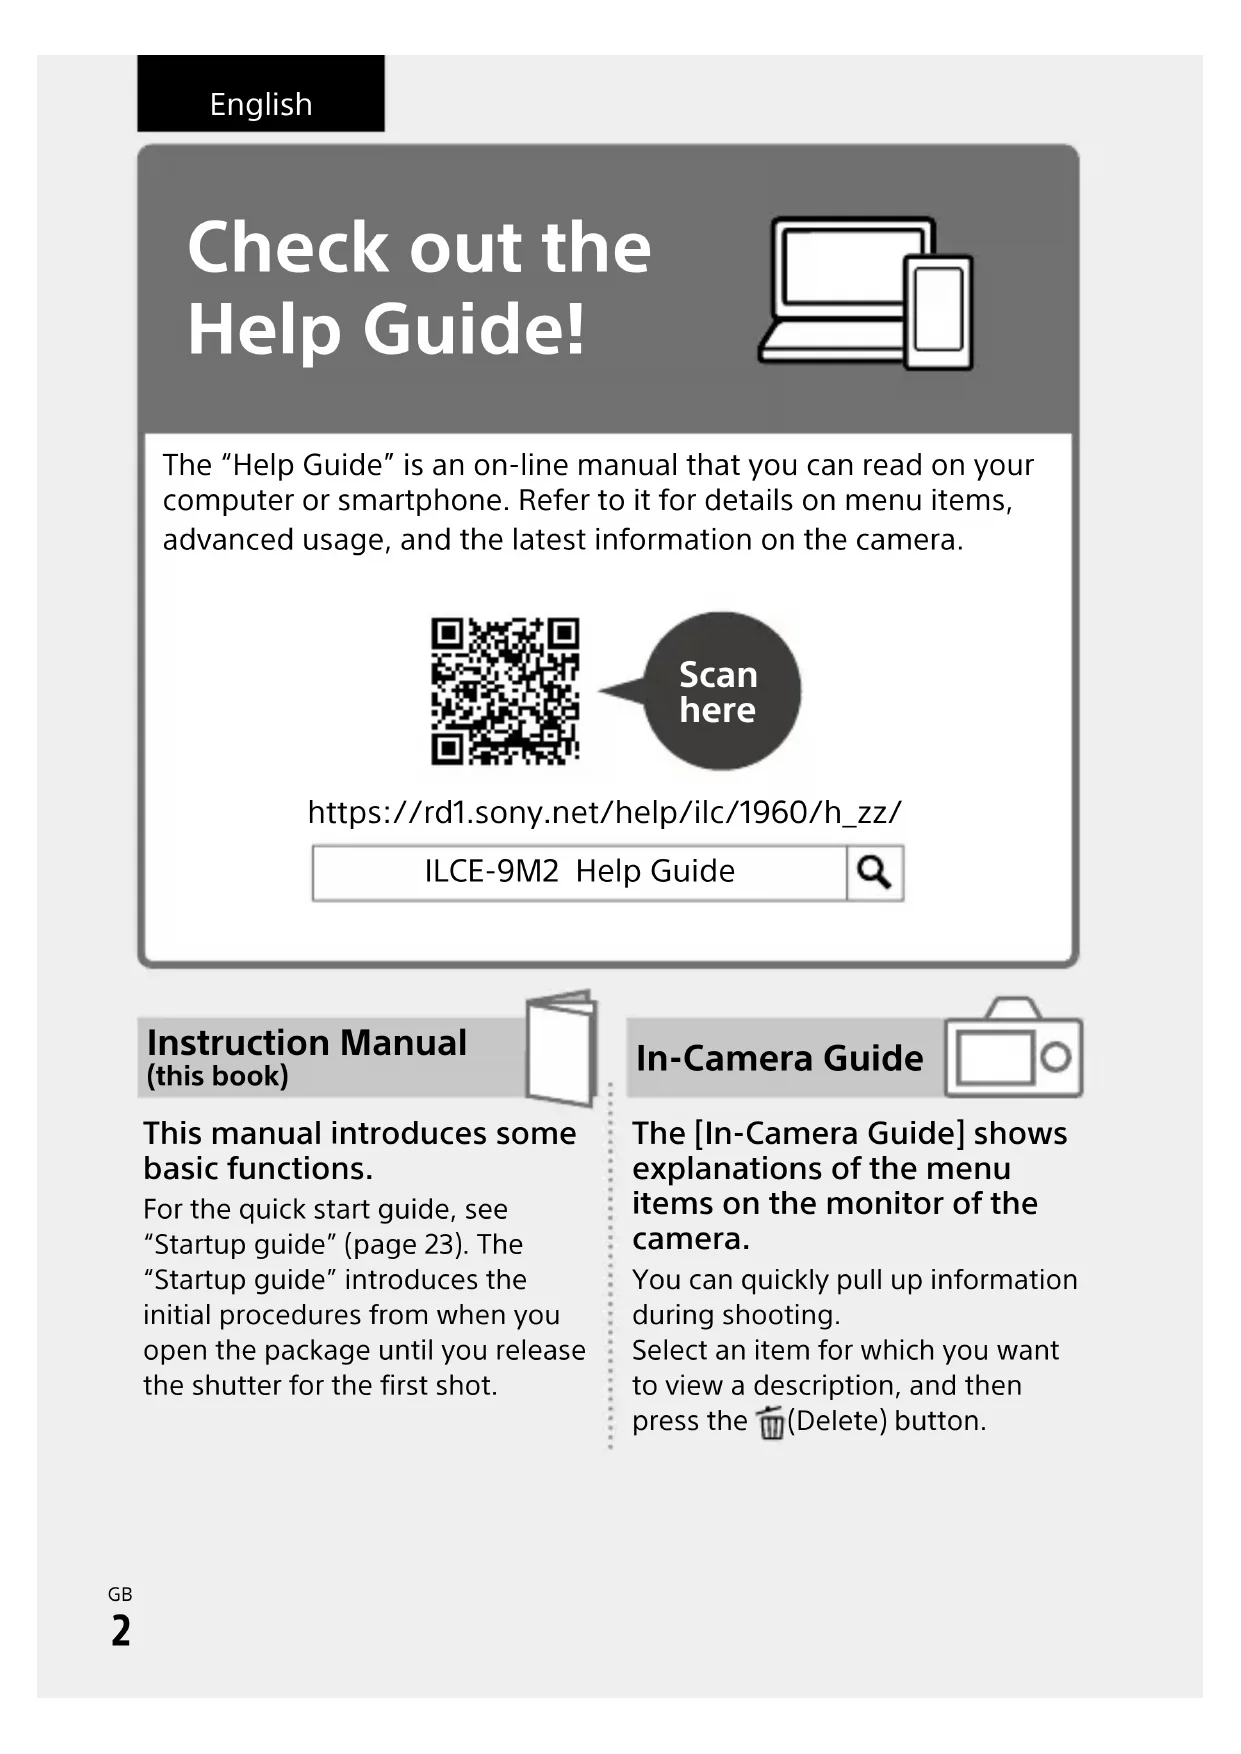
Check out the Help Guide!

The "Help Guide" is an on-line manual that you can read on your computer or smartphone. Refer to it for details on menu items, advanced usage, and the latest information on the camera.

Scan here
https://rd1.sony.net/help/ilc/1960/h_zz/
ILCE-9M2 Help Guide

Instruction Manual (this book)

This manual introduces some basic functions.
For the quick start guide, see "Startup guide" (page 23). The "Startup guide" introduces the initial procedures from when you open the package until you release the shutter for the first shot.
In-Camera Guide

The [In-Camera Guide] shows explanations of the menu items on the monitor of the camera.
You can quickly pull up information during shooting. Select an item for which you want to view a description, and then press the (Delete) button.
Notes on using your camera
Along with this section, also see "Precautions" in the Help Guide.
Notes on handling the product
- This camera is designed to be dust resistant and splash resistant, but it is not guaranteed to completely prevent the ingress of dust or water droplets.
- Do not leave the lens or the viewfinder exposed to a strong light source such as sunlight. Because of the lens's condensing function, doing so may cause smoke, fire, or a malfunction inside the camera body or the lens. If you have to leave the camera exposed to a light source such as sunlight, attach the lens cap to the lens.
- When you shoot with backlighting, keep the sun sufficiently far away from the angle of view. Otherwise, the sunlight may focus inside the camera and cause smoke or fire. Even if the sun is slightly away from the angle of view, it may still cause smoke or fire.
- Do not directly expose the lens to beams such as laser beams. That may damage the image sensor and cause the camera to malfunction.
- Do not look at sunlight or a strong light source through the lens when it is detached. This may result in unrecoverable damage to the eyes.
- Do not leave the camera, the supplied accessories, or memory cards within the reach of infants. They may be accidentally swallowed. If this occurs, consult a doctor immediately.
Notes on the monitor and electronic viewfinder
- The monitor and electronic viewfinder are manufactured using extremely high-precision technology, and over 99.99% of the pixels are operational for effective use. However, there may be some small black dots and/or bright dots (white, red, blue or green in color) that constantly appear on the monitor and electronic viewfinder. These dots are normal due to the manufacturing process and do not affect the images in any way.
- When shooting with the viewfinder, you may experience symptoms such as eyestrain, fatigue, travel sickness, or nausea. We recommend that you take a break at regular intervals when you are shooting with the viewfinder.
- If the monitor or electronic viewfinder is damaged, stop using the camera immediately. The damaged parts may harm your hands, face, etc.
Notes on continuous shooting
During continuous shooting, the monitor or viewfinder may flash between the shooting screen and a black screen. If you keep watching the screen in this situation, you may experience uncomfortable symptoms such as feeling of unwellness. If you experience uncomfortable symptoms, stop using the camera, and consult your doctor as necessary.
Notes on recording for long periods of time or recording 4K movies
- The camera body and battery may become warm with use - this is normal.
- If the same part of your skin touches the camera for a long period of time while using the camera, even if the camera does not feel hot to you, it may cause symptoms of a low-temperature burn such as redness or blistering. Pay special attention in the following situations and use a tripod, etc.
-When using the camera in a high-temperature environment
- When someone with poor circulation or impaired skin sensation uses the camera
- When using the camera with the Auto Power OFF Temp. set to [High].
Notes on shooting with an external flash
When shooting with an external flash, light and dark stripes may appear on the image if the shutter speed is set to faster than 1/4000 seconds.
Sony lenses/accessories
Using this unit with products from other manufacturers may affect its performance, leading to accidents or malfunction.
On the data specifications described in this manual
The data on performance and specifications are defined under the following conditions, except as described in this manual: at an ordinary ambient temperature of 25^ (77^) , and using a battery pack that has been fully charged until the charge lamp has turned off.
Warning on copyright
Television programs, films, videotapes, and other materials may be copyrighted. Unauthorized recording of such materials may be contrary to the provisions of the copyright laws.
Notes on location information
If you upload and share an image tagged with a location, you may accidentally reveal the information to a third party. To prevent third parties from obtaining your location information, set
[□Location Info. Link Set.] to [Off] before shooting images.
Notes on discarding or transferring this product to others
When discarding or transferring this product to others, make sure to perform the following operation to protect private information.
- [Setting Reset] [Initialize]
Notes on discarding or transferring a memory card to others
Executing [Format] or [Delete] on the camera or a computer may not completely delete the data on the memory card. When transferring a memory card to others, we recommend that you delete the data completely using data deletion software. When discarding a memory card, we recommend that you physically destroy it.
Note on network functions
When you use network functions, unintended third parties on the network may access the camera, depending on the usage environment.
For example, unauthorized access to the camera may occur in network environments to which another network device is connected or can connect without permission. Sony bears no responsibility for any loss or damage caused by connecting to such network environments.
Note on the 5 GHz band for wireless LAN
When using the wireless LAN function outdoors, set the band to 2.4 GHz by following the procedure below. (WW942051 only)
- MENU (Network) [Wi-Fi Settings]
How to turn off wireless network functions (Wi-Fi, etc.) temporarily
When you board an airplane, etc., you can turn off all wireless network functions temporarily using [Airplane Mode].
CAUTION
For safety, do not connect the connector for peripheral device wiring that might have excessive voltage to LAN terminal. Follow the instructions for LAN terminal.
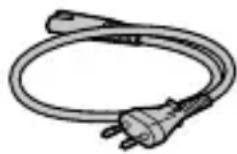
Power Cord
For the customers in the UK, Ireland, Malta, Cyprus and Saudi Arabia Use the power cord (A). For safety reasons, the power cord (B) is not intended for above countries/regions and shall therefore not be used there. For the customers in other EU countries/regions Use the power cord (B).
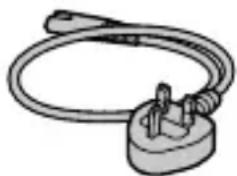
(A) (B)
LAN cable
Use a Category 5e or higher Shielded Twisted Pair (STP) cable with high shielding performance.
For Customers in the U.S.A.
For question regarding your product or for the Sony Service Center nearest you, call 1-800-222-SONY (7669).
Supplier's Declaration of Conformity
Trade Name: SONY
Model No.: WW942051
Responsible Party: Sony Electronics Inc.
Address: 16535 Via Esprillo, San
Diego, CA 92127 U.S.A.
Telephone Number: 858-942-2230
This device complies with part 15 of the FCC rules. Operation is subject to the following two conditions:
(1) This device may not cause harmful interference, and (2) this device must accept any interference received, including interference that may cause undesired operation.
For customers who purchased their camera from a store in Japan that caters to tourists
Note
Some certification marks for standards supported by the camera can be confirmed on the screen of the camera.
Select MENU (Setup) [Certification Logo].
For details on the Wi-Fi functions and NFC One-touch functions, refer to the "Help Guide" (page 2).
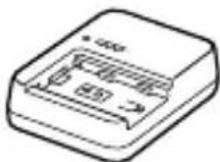
Checking the camera and the supplied items
The number in parentheses indicates the number of pieces.
- Camera (1)
- Battery charger (1)
- Power cord (mains lead) (1)^* (supplied in some countries/ regions)

-
Multiple power cords may be supplied with this equipment. Use the appropriate one that matches your country/region. See page 5.
-
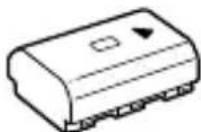
Rechargeable battery pack NP-FZ100 (1)
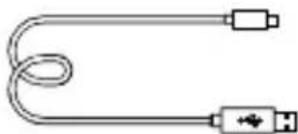
USB Type-CTM cable (1)
Shoulder strap (1)

- Body cap (1) (Attached to the camera)

- Cable protector (1)

- Shoe cap (1) (Attached to the camera)
- Eyepiece cup (1) (Attached to the camera)
- Instruction Manual (1) (this manual)
Reference Guide (1)
Identifying parts
See the pages in parentheses for details.
Front side
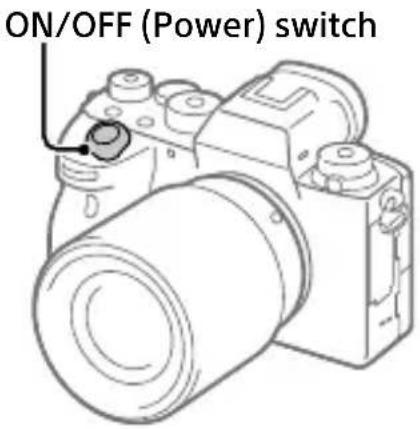
1 ON/OFF (Power) switch (30)/Shutter button (31)
2 Front dial You can quickly adjust the settings for each shooting mode.
3 Infrared remote sensor
4 Lens release button (29)
5 Microphone Do not cover this part during movie recording. Doing so may cause noise or lower the volume.
6 AF illuminator (66)/Self-timer lamp
When the lens is removed
7 Mounting index (28)
8 Image sensor*
9 Mount
10 Lens contacts*
- Do not directly touch these parts.
Rear side
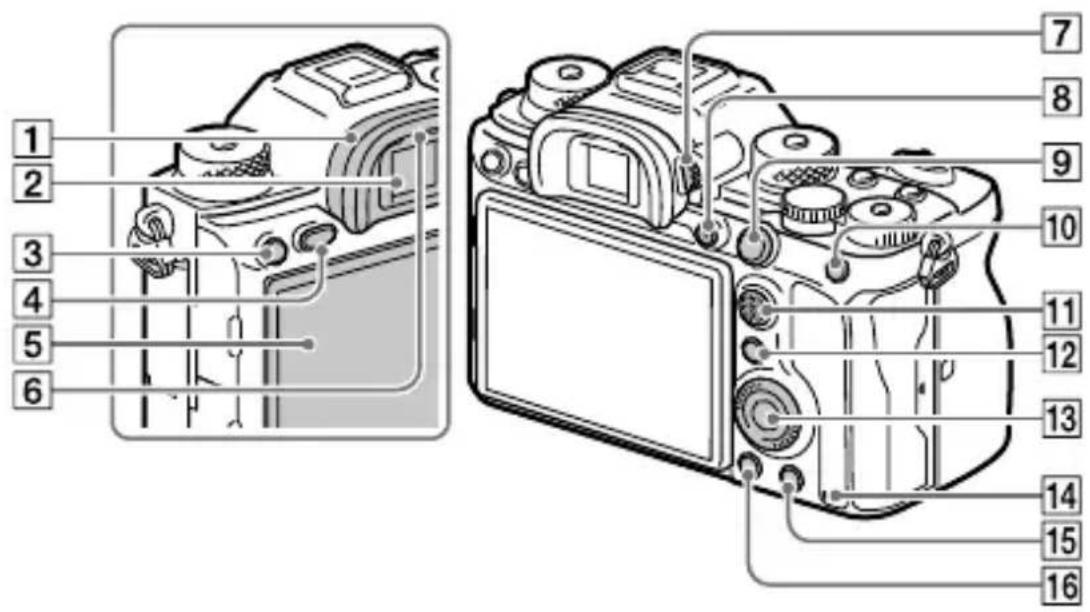
GB
1 Eyepiece cup To remove the eyepiece cup Push the grips at the bottom of the eyepiece cup to the left and right and lift up the cup.
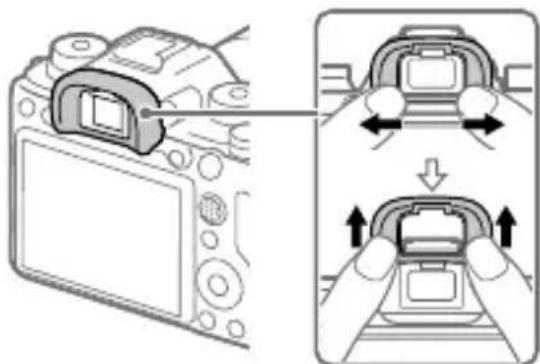
Remove the eyepiece cup when attaching an angle finder (sold separately). Also, select MENU
2 (Camera Settings 2) [FINDER/MONITOR], and then switch to [Viewfinder (Manual)] or [Monitor (Manual)].
Viewfinder
3 C3 button (Custom button 3) (73)/o-n (Protect) button
4 MENU button (63)
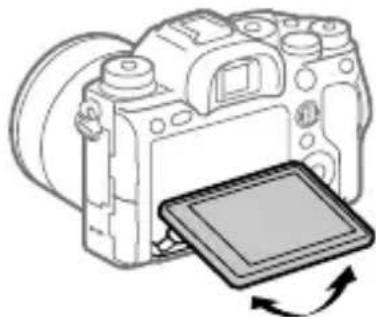
Monitor (For touch operation: Touch panel/Touch pad) (47) You can adjust the monitor to an easily viewable angle and shoot from any position.
6 Eye sensor
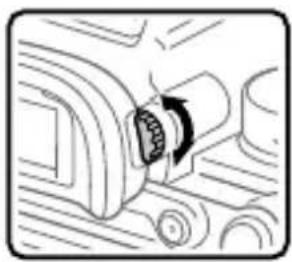
7 Diopter-adjustment dial Adjust the diopter-adjustment dial according to your eyesight until the display appears clearly in the viewfinder. If it is hard to operate the diopter-adjustment dial, remove the eyepiece cup before operating the dial.
MOVIE (Movie) button (32)
For shooting: AF-ON (AF On) button For viewing: (Enlarge Image) button
10 For shooting: AEL button For viewing: image Index) button
11 Multi selector (18)
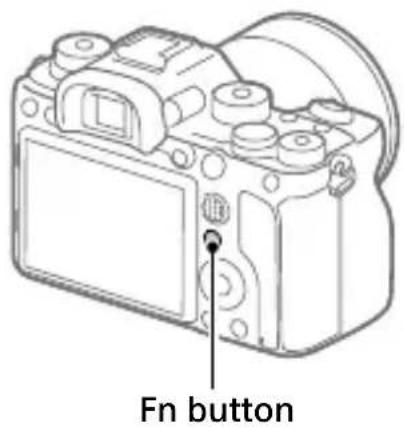
12 For shooting: Fn (Function) button (18, 73) For viewing: (Send to Smartphone) button
You can display the screen for [Send to Smartphone] by pressing this button.
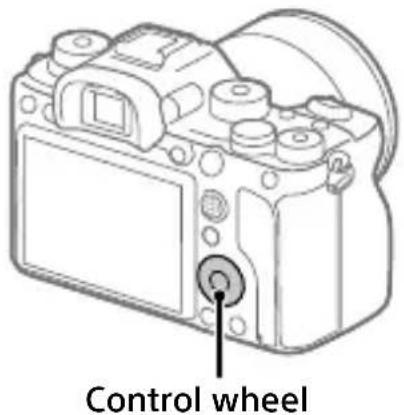
13 Control wheel (17)
14 Access lamp
15 For shooting: C4 button (Custom button 4) (73) For viewing: (Delete) button (32)
16 (Playback) button (32)
Top side

GB
1 Mode dial (32)
The mode dial is unlocked while you hold down the unlock button at the center.
2 Rear dial
You can quickly adjust the settings for each shooting mode.
3 Exposure compensation dial Pressing the lock button at the center switches the exposure compensation dial between the locked and unlocked status. The dial is unlocked when the lock button is popped up and the white line is visible.
4 image sensor position mark
- The image sensor is the sensor that converts light into an electric signal. The mark shows the location of the image sensor. When you measure the exact distance between the camera and the subject, refer to the position of the horizontal line.
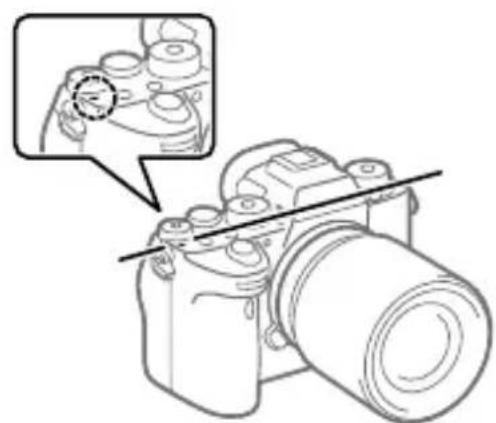
- If the subject is closer than the minimum shooting distance of the lens, the focus cannot be confirmed. Make sure you put enough distance between the subject and the camera.
C1 button (Custom button 1) (73)
C2 button (Custom button 2) (73)
7 Multi Interface Shoe* Some accessories may not go in all the way and protrude backward from the Multi interface shoe. However, when the accessory reaches the front end of the shoe, the connection is completed.
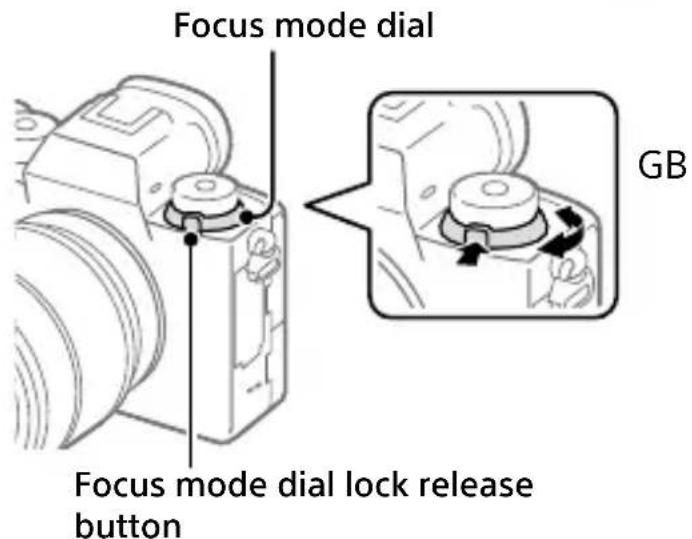
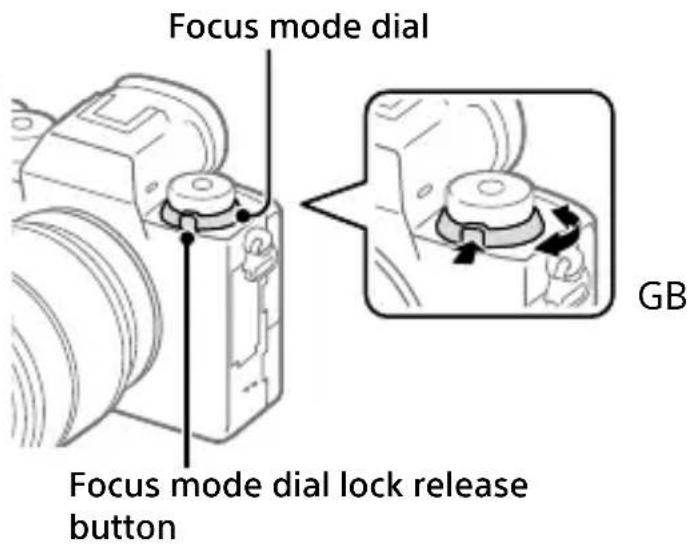
8 Upper: Drive mode dial (45) The drive mode dial is unlocked while the unlock button at the center is being pressed. Lower: Focus mode dial (33) The focus mode dial is unlocked while the unlock button at the front is being pressed.
- For details on compatible accessories for the Multi Interface Shoe, visit the Sony website, or consult your Sony dealer or local authorized Sony service facility. Accessories for the Accessory Shoe can also be used. Operations with other manufacturers' accessories are not guaranteed.

Accessory Shoe
Sides
GB
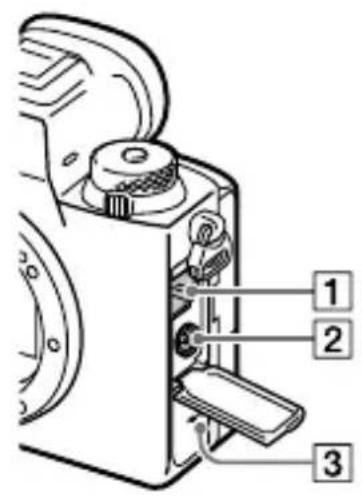
1 LAN terminal
2 Flash sync) terminal
3 Speaker
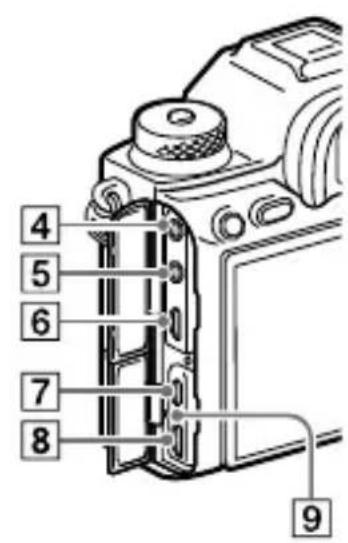
4 (Microphone) jack When an external microphone is connected, the built- in microphone turns off automatically. When the external microphone is a plugin-power type, the power of the microphone is supplied by the camera.
5 (Headphones) jack
6 HDMI micro jack
7 USB Type-C terminal (14)
Multi/Micro USB Terminal* (14) This terminal supports Micro USB-compatible devices.
9 Charge lamp
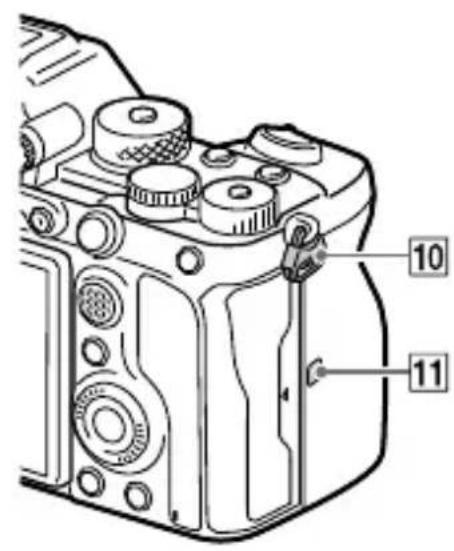
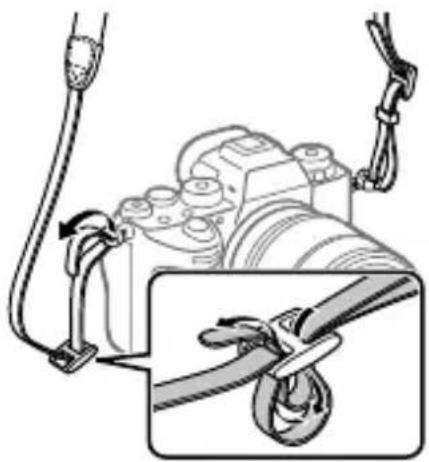
10 Hooks for shoulder strap Attach both ends of the strap onto the camera.
11 N-Mark) (58)
- This mark indicates the touch point for connecting the camera and an NFC-enabled Smartphone.
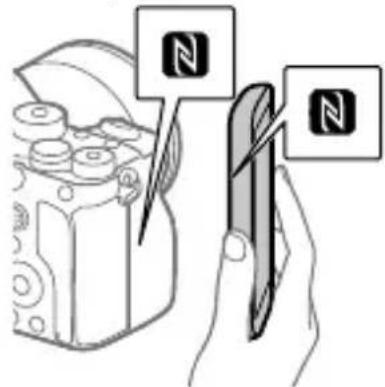
- NFC (Near Field Communication) is an international standard of short-range wireless communication technology.
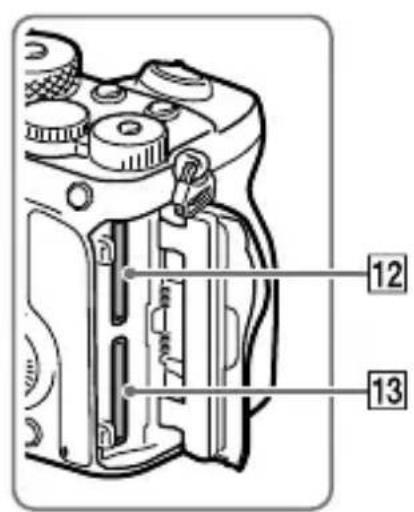
12 SLOT 1 (Memory card slot 1) (25)
Supports SD cards only (compatible with UHS-I and UHS-II)
13 SLOT 2 (Memory card slot 2) (27) Supports SD cards only (compatible with UHS-I and UHS-II)
- For details on compatible accessories for the Multi/Micro USB Terminal, visit the Sony website, or consult your Sony dealer or local authorized Sony service facility.
Notes on USB terminals
You can use either the USB Type-C terminal or the Multi/ Micro USB Terminal for supplying power, charging the battery, and USB communications. However, you cannot conduct these operations with both terminals simultaneously.
-
The battery charging time does not change according to the terminal you use.
-
You can use accessories for the Multi/Micro USB Terminal, such as a remote commander (sold separately), while supplying power or performing PC Remote shooting using the USB Type-C terminal.
Notes on the terminal cover
Ensure that the terminal cover is closed before use.
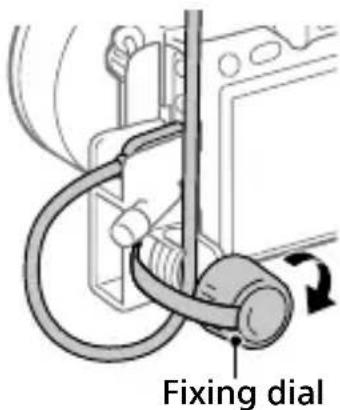
Notes on the cable protector
Use the cable protector to prevent a cable from being disconnected when shooting images with the cable connected.
To attach the cable protector
① Open both of the jack covers on the monitor side.
② Fit the two hooks on the rear side of the cable protector into the two notches to the left of the USB Type-C terminal and Multi/Micro USB Terminal, and then align the cable protector with the terminal part of the camera.
③ Push the attachment screw in and turn it to secure the cable protector.
④ Insert the cable into one of the jacks.
⑤ Insert the cable into the holding part and then secure the cable with the fixing dial.

To remove the cable protector
Loosen the attachment screw, and then remove the cable protector.
Bottom
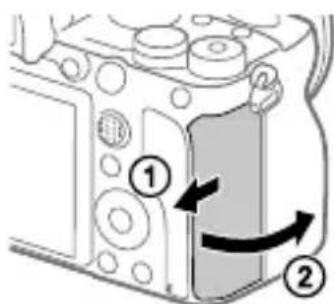
1 Lock lever (24)
2 Battery insertion slot (24)
3 Battery cover (24)
When attaching an accessory such as a vertical grip (sold separately), remove the battery cover.
To remove the battery cover Pull the battery cover release lever in the direction of the arrow, and then remove the battery cover.
Battery cover release lever
To attach the battery cover Insert the shaft on one side of the battery cover into the attachment site, and then push in the battery cover by attaching the shaft on the opposite side.
4 Tripod socket hole
Use a tripod with a screw less than 5.5mm (7/32 inches) long. Otherwise, you cannot firmly secure the camera, and damage to the camera may occur.
Basic operations
Using the control wheel
-
You can select setting items by turning or pressing the top/bottom/left GB right side of the control wheel. Your selection is determined when you press the center of the control wheel.
-
The DISP (Display Setting) and ISO (ISO) functions are assigned to the top/right side of the control wheel. In addition, you can assign selected functions to the left/right/bottom side and the center of the control wheel, and to the rotation of the control wheel.
-
During playback, you can display the next/previous image by pressing the right/left side of the control wheel or by turning the control wheel.
Using the multi selector
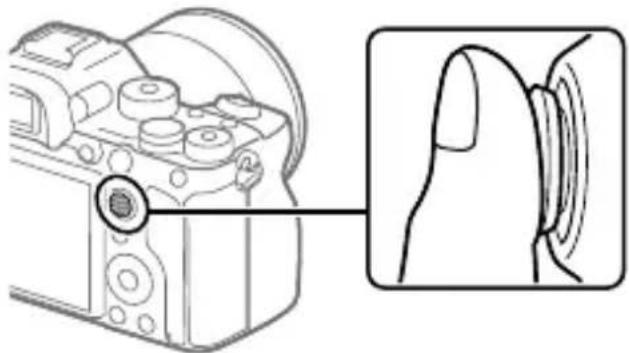
- Put your finger right on top of the multi selector to manipulate it more precisely.
- When [Focus Area] is set to [Zone], [Flexible Spot],
[Expand Flexible Spot], [Tracking: Zone], [Tracking: Flexible Spot], or [Tracking: Expand Flexible Spot], you can move the focus area by pressing the multi selector up/down/left/right.
- The [Focus Standard] function is assigned to the center of the multi selector in the default settings.
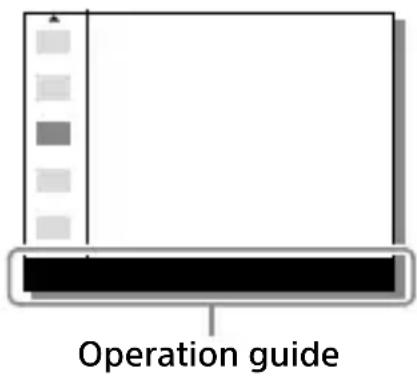
Using the Fn (Function) button (Function menu)
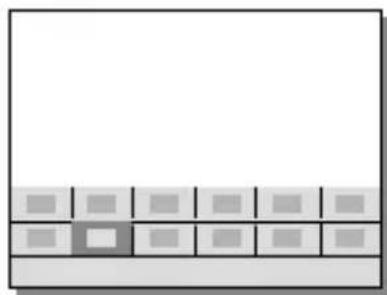
The Function menu is a menu of 12 functions that is displayed at the bottom of the screen when you press the Fn (Function) button in the shooting mode. You can access frequently used functions more quickly by registering them to the function menu.

Hint
- You can register twelve functions to the Function menus for still image shooting and movie shooting, respectively.
- You can recall functions more quickly by using the custom key function (page 73) to assign frequently used functions to desired keys, along with the function menu.
1 Press the DISP on the control wheel repeatedly to display a screen mode other than [For viewfinder], and then press the Fn (Function) button.
2 Select the desired function by pressing the top/bottom/left/right side of the control wheel.
GB
3 Select the desired setting by turning the front dial, and press the center of the control wheel.
- Some functions can be fine-tuned using the rear dial.
To adjust settings from the dedicated setting screens
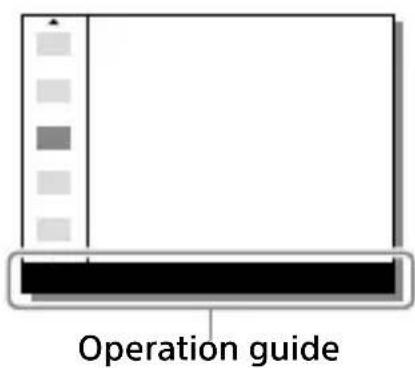
Select the desired function in step 2, then press the center of the control wheel. The dedicated setting screen for the function will appear. Follow the operating guide to adjust settings.
To change the functions in the function menu (Function Menu Set.)
The following is the procedure for changing [Drive Mode] in the function menu for still images to [Grid Line].
- To change the movie function menu, select a movie function menu item in Step ②.
① MENU 2 (Camera Settings 2) [Function Menu Set.].
(2) Select Drive Mode) from among the twelve still image function menu items using the top/bottom/left/right side of the control wheel, and then press the center.
③ Move to the [Display/Auto Review] screen using the left/right side of the control wheel. Then, select [Grid Line] and press the center of the control wheel.
Grid Line) will be displayed in the former location of
Drive Mode) in the function menu.
How to use the Quick Navi screen
The Quick Navi screen is a function optimized for shooting with the viewfinder, that lets you control settings directly.
1 MENU 2 (Camera Settings 2) [DISP Button] [Monitor].
2 Place a mark on [For viewfinder] and then select [Enter].
3 Press the DISP on the control wheel to set the screen mode to [For viewfinder].
4 Press the Fn button to switch to the Quick Navi screen.
- The displayed contents and their positions in the illustrations are just guidelines, and may differ from the actual displays.
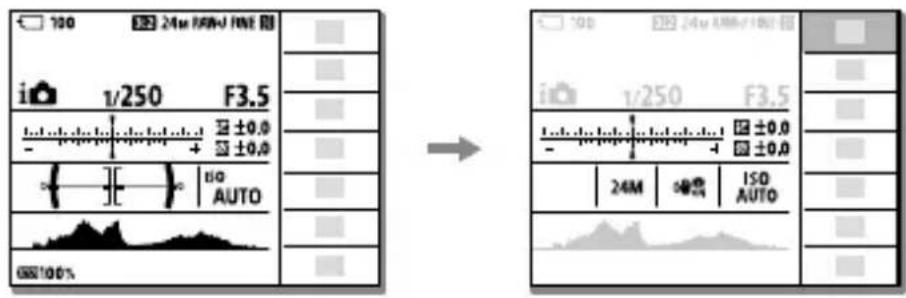
Auto mode
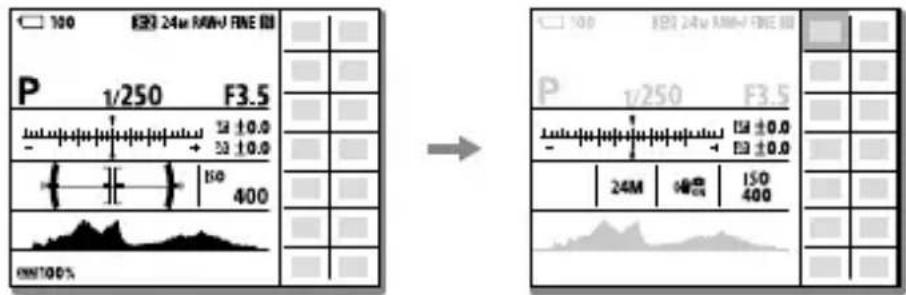
P/A/S/M mode
GB
5 Select a function to set by pressing the top/bottom/left/right side of the control wheel.
6 Select the desired setting by turning the front dial.
- Some functions can be fine-tuned using the rear dial.
To adjust settings from the dedicated setting screens
Select the desired function in step 5, then press the center of the control wheel. The dedicated setting screen for the function will appear. Follow the operating guide to adjust settings.
Note
- Items that are gray on the Quick Navi screen are not adjustable.
- When using [Creative Style], etc., some of the setup tasks can only be accomplished on a dedicated screen.
Startup guide
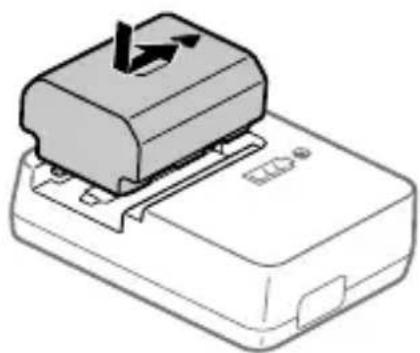
Step 1: Charging the battery pack
1 Insert the battery pack into the battery charger.
- Place the battery pack on the battery charger in the direction of the .
- Slide the battery pack in the direction of the arrow as far as it will go.
GB
2 Connect the power cord (supplied) to the battery charger, and connect the battery charger to the wall outlet (wall socket).
The CHARGE lamp on the battery charger will light up in orange and charging will start.
CHARGE lamp (orange)
Lit: Charging
Flashing: Charging error or charging paused temporarily because the camera is not within the proper temperature range
- When charging is finished, the CHARGE lamp and all indicators turn off.
- Charging time (full charge): approximately 150 min. (when charging a fully depleted battery pack at a temperature of 25^ ( 77^ ))
- When you use a completely new battery pack or a battery pack that has not been used for a long time, the CHARGE lamp may flash quickly when the battery is charged for the first time. If this happens, remove the battery pack and then re-insert it to recharge.
- Be sure to use only genuine Sony brand battery packs.

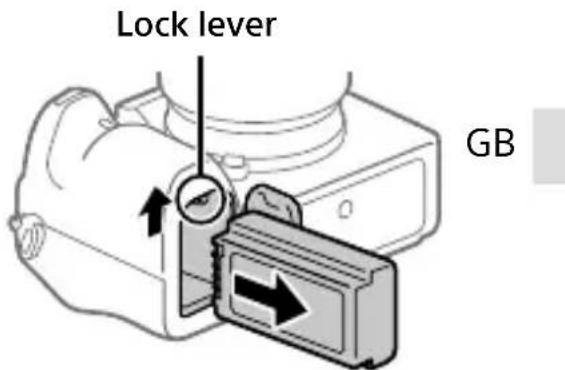
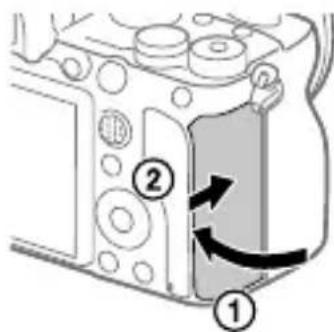
Step 2: Inserting the battery pack into the camera
1 Open the battery cover.
2 Insert the battery pack while pressing the lock lever with the tip of the battery until the battery locks into place.
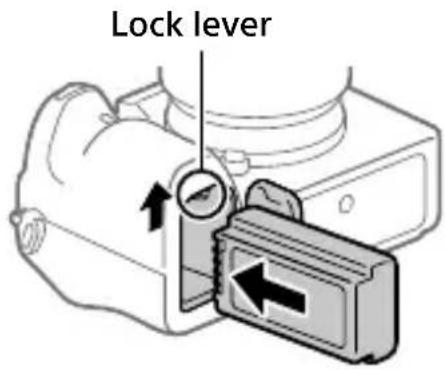
3 Close the cover.
To charge the battery pack while it is inserted in the camera
Turn the camera off and connect it to a device such as a computer using the USB cable.
If you turn on the camera, power will be supplied from the computer or the device that you connected, and you will be able to operate the camera. However, the battery pack will not charge.
Use the USB Type-C cable (supplied) or a USB-standard cable.
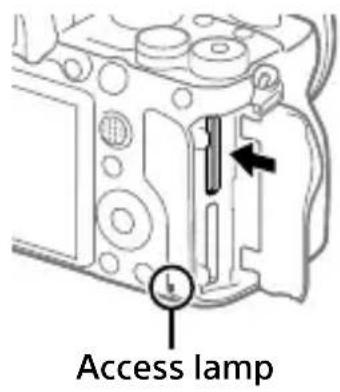
To remove the battery pack
Make sure that the access lamp (page 10) is not lit, and turn off the camera. Then, slide the lock lever and remove the battery pack. Be careful not to drop the battery pack.
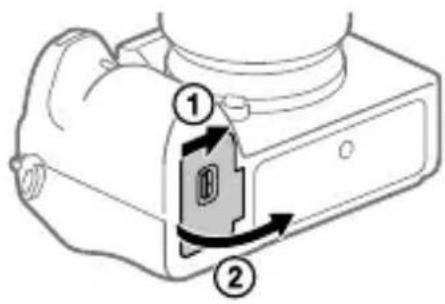
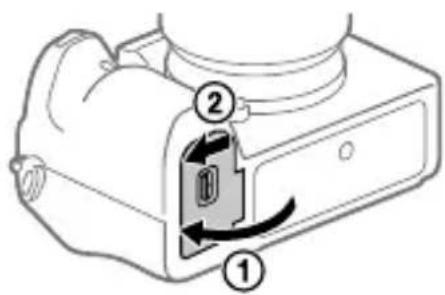
Step 3: Inserting a memory card
For details on memory cards that can be used with this camera, refer to page 88.
1 Open the memory card cover.
2 Insert the SD card into the slot 1.
- Both the slot 1 (upper) and the slot 2 (lower) only support SD memory cards (compatible with UHS-II).
This camera does not support Memory Stick media. - Insert the memory card with the terminal side facing toward you, until it clicks into place.
- You can change which memory card slot to use by selecting MENU
(Setup) [Rec. Media Settings] [Prioritize Rec. Media].
The slot 1 is used in the default settings.
3 Close the cover.
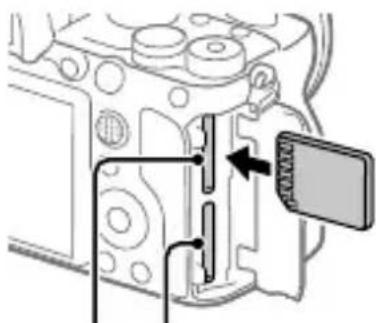
Slot 1 Slot 2
Hint
- When you use a memory card with the camera for the first time, it is recommended that you format the card on the camera for more stable performance of the memory card (page 79).
To remove the memory card
Make sure that the access lamp (page 10) is not lit, and then push in the memory card once to remove it.
To record to memory cards in two slots
The slot 1 is used in the default settings. If you do not intend to change the settings and will only use one memory card, use the slot 1.
By inserting another memory card into the slot 2, you can record the same images to two memory cards simultaneously or record a different type of image (still images/movies) to each memory card ([Recording Mode] under [Rec. Media Settings]) (page 79).
GB
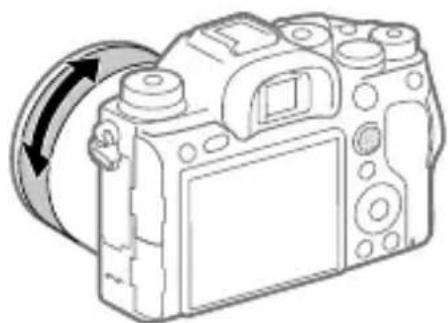
Step 4: Attaching a lens
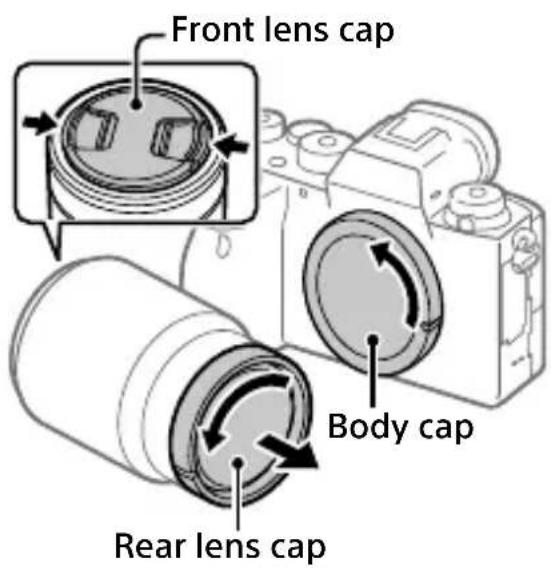
1 Remove the body cap from the camera and the rear lens cap from the rear of the lens.
- When changing the lens, work quickly in a dust-free environment to keep dust or debris from getting inside the camera.
- It is recommended that you attach the front lens cap when you have done shooting.
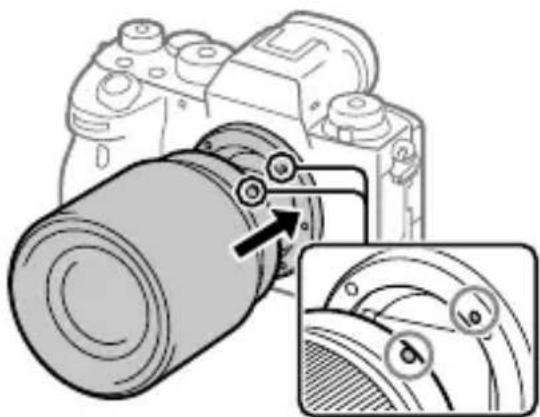
2 Mount the lens by aligning the two white index marks (mounting indexes) on the lens and camera.
- Hold the camera with the lens facing down to prevent dust or debris from entering the camera.
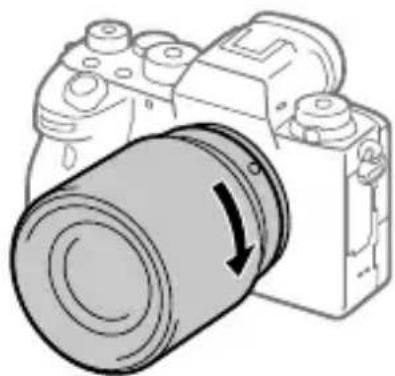
3 While pushing the lens lightly toward the camera, turn the lens slowly in the direction of the arrow until it clicks into the locked position.
Note
- Be sure to hold the lens straight and do not use force when attaching a lens.
- Do not press the lens release button when attaching a lens.
- The Mount Adaptor (sold separately) is required to use an A-mount lens (sold separately). For details, refer to the operating manual supplied with the Mount Adaptor.
- If you want to shoot full-frame images, use a full-frame size compatible lens.
- When carrying the camera with a lens attached, hold both the camera and the lens firmly.
- Do not hold the part of the lens that is extended for zoom or focus adjustment.
To remove the lens
Keep pressing the lens release button and turn the lens in the direction of the arrow until it stops.
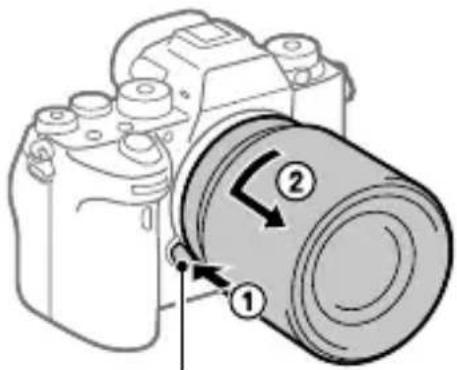
Lens release button
Compatible lenses
Lenses compatible with this camera are as follows:
GB
| Lens Compatibility with the | camera | |
| A-mount lens | Lens compatible with 35 mm full-frame format | ✓ (An optional Mount Adaptor (sold separately) compatible with full-frame format is required) |
| APS-C size dedicated lens | ✓* (An optional Mount Adaptor (sold separately) is required) | |
| E-mount lens | Lens compatible with 35 mm full-frame format | ✓ |
| APS-C size dedicated lens | ✓* | |
- Images will be recorded in APS-C size. The angle of view will correspond to approximately 1.5 times the focal length indicated on the lens. (For example, the angle of view will correspond to 75 ~mm when a 50 ~mm -lens is attached.)
Step 5: Setting the language and the clock
1 Set the ON/OFF (Power) switch to "ON" to turn on the camera.
2 Select the desired language and then press the center of the control wheel.
3 Make sure that [Enter] is selected on the screen and then press the center.
4 Select the desired geographic location and then press the center.
5 Select [Date/Time] using the top/bottom of the control wheel or by turning the control wheel, and then press the center.
6 Select the desired item by pressing the top/bottom/left/right side of the control wheel, and then press the center.
7 Repeat steps 5 and 6 to set other items, then select [Enter] and press the center.
Hint
- To reset the date and time setting, use MENU (page 78).
Note
- This camera does not have a function for inserting the date into images. You can insert the date into images and then save and print them using PlayMemories Home (for Windows only).
Step 6: Shooting images in auto mode
GB

1 Press and hold the lock release button in the center of the mode dial, then turn the mode dial to set to AUTO.
The shooting mode will be set to i (telligent Auto).
2 Look into the viewfinder or the monitor and hold the camera.
3 Set the size of the subject by rotating the zoom ring of the lens when a zoom lens is attached.
4 Press the shutter button halfway down to focus.
- When the image is in focus, an indicator (such as ) will light up.
5 Press the shutter button all the way down.
To shoot movies
Press the MOVIE button to start/stop recording.
To play back images
Press the l Playback) button to play back images. You can select the desired image using the control wheel.
To delete displayed image
Press the Delete) button while an image is displayed to delete it. Select [Delete] using the control wheel on the confirmation screen, and then press the center of the control wheel to delete the image.
To shoot images in various shooting modes
Set the mode dial to the desired mode depending on the subject or the functions you want to use.
Focusing
Focus Mode
Selects the focus method to suit the movement of the subject.
Turn the focus mode dial while pressing the focus mode dial lock release button and select the desired mode.
AF-S (Single-shot AF): The product locks the focus once focusing is complete. Use this when the subject is motionless.
AF-C (Continuous AF): The product continues to focus while the shutter button is pressed and held halfway down. Use this when the subject is in motion. In [Continuous AF] mode, there is no beep when the camera focuses.
DMF (DMF): You can make fine adjustments manually after performing auto focusing, letting you focus on a subject more quickly than when using the manual focus from the beginning. This is convenient in situations such as macro shooting.
MF (Manual Focus): Adjusts the focus manually. If you cannot focus on the intended subject using auto focus, use manual focus.
Focus indicator
- (lit): The subject is in focus and the focus is locked.
- (flashing): The subject is not in focus.
(lit): The subject is in focus. The focus will be adjusted continuously according to the movements of the subject.
(lit): Focusing is in progress.
Subjects on which it is difficult to focus using auto focus
- Dark and distant subjects
- Subjects with poor contrast
- Subjects seen through glass
- Fast-moving subjects
- Reflective light or shiny surfaces
- Flashing light
Back-lit subjects - Continuously repetitive patterns, such as the facades of buildings
- Subjects in the focusing area with different focal distances
Hint
- In [Continuous AF] mode, you can lock the focus by pressing and holding the button that has been assigned the [Focus Hold] function (page 73).
- When you set the focus to infinity in the manual focus mode or the direct manual focus mode, make sure that the focus is on a sufficiently distant subject by checking the monitor or the viewfinder.
Note
- When [Continuous AF] is set, the angle of view may change little by little while focusing. This does not affect the actual recorded images.
- Even if the focus mode dial is set to AF-S or DMF, the focus mode will switch to [Continuous AF] when shooting movies or when the mode dial is set to S&Q.
Auto focus
Focus Area
Selects the focusing area. Use this function when it is difficult to focus properly in the auto focus mode.
MENU 1(Camera Settings 1) [Focus Area] desired setting.
Wide: Focuses on a subject covering the whole range of the screen automatically. When you press the shutter button halfway down in the still image shooting mode, a green frame is displayed around the area that is in focus.
GB
Zone: Select a zone on the monitor on which to focus, and the product will automatically select a focus area.
Center: Focuses automatically on a subject in the center of the image. Use together with the focus-lock function to create the composition you want.
Flexible Spot: Allows you to move the focusing frame to a desired point on the screen and focus on an extremely small subject in a narrow area.
Expand Flexible Spot: If the product cannot focus on a single selected point, it uses focus points around the flexible spot as a secondary priority area for focusing.
[0] [1] [2] [3] [4] [5] [6] [7] [8] [9] [10] [11] [12] [13] [14] [15] [16] [17] [18] [19] [20] [21] [22] [23] [24] [25] [26] [27] [28] [29] [30] [31] [32] [33] [34] [35] [36] [37] [38] [39] [40] [41] [42] [43] [44] [45] [46] [47] [48] [49] [50] [51] [52] [53] [54] [55] [56] [57] [58] [59] [60] [61] [62] [63] [64] [65] [66] [67] [68] [69] [70] [71] [72] [73] [74] [75] [76] [77] [78] [79] [80] [81] [82] [83] [84] [85] [86] [87] [88] [89] [90]
Examples of the focusing frame display
The focusing frame differs as follows.
When focusing on a larger area

When focusing on a smaller area
- When [Focus Area] is set to [Wide] or [Zone], the focusing frame may switch between "When focusing on a larger area" and "When focusing on a smaller area" depending on the subject or situation.
- When you attach an A-mount lens with a Mount Adaptor (LA-EA1 or LA-EA3) (sold separately), the focusing frame for "When focusing on a smaller area" may be displayed.
When focus is achieved automatically based on the whole range of the monitor
- When you use a zoom function other than the optical zoom, the [Focus Area] setting is disabled and the focusing frame is shown by the dotted line. The AF operates with priority on and around the center area.
To move the focus area
- You can move the focus area in [Flexible Spot], [Expand Flexible Spot], [Zone], [Tracking: Flexible Spot], [Tracking: Expand Flexible Spot], or [Tracking: Zone] by operating the multi selector. If you assign [Focus Standard] to the center of the multi selector beforehand, you can move the focusing frame back to the center of the monitor by pressing the center of the multi selector.
- You can move the focusing frame quickly by touching and dragging it on the monitor. Set [Touch Operation] (page 47) to [On] and [Func. of Touch Operation] (page 48) to [Touch Focus] beforehand.
To track the subject temporarily (Tracking On)
You can temporarily change the setting for [Focus Area] to [Tracking] while you press and hold down the custom key to which you have assigned [Tracking On] in advance. The [Focus Area] setting before you activated [Tracking On] will switch to the equivalent [Tracking] setting. For example:
| [Focus Area] before you activate [Tracking On] | [Focus Area] while [Tracking On] is active |
| [Wide] [Tracking: Wide] | |
| [Flexible Spot: S] [Tracking: Flexible Spot S] | |
| [Expand Flexible Spot] [Tracking: Expand Flexible Spot] |
Hint
- In the default settings, [Focus Area] is assigned to the C2 button.
Note
- [Focus Area] is locked to [Wide] in the following situations:
- [Intelligent Auto]
- The focus area may not light up during continuous shooting or when the shutter button is pressed all the way down at once.
- When the mode dial is set to Movie) or ,during movie shooting, [Tracking] cannot be selected as the [Focus Area].
Manual Focus
When it is difficult to focus properly in the autofocus mode, you can adjust the focus manually.
1 Turn the focus mode dial while pressing the focus mode dial lock release button and select MF.
Focus mode dial
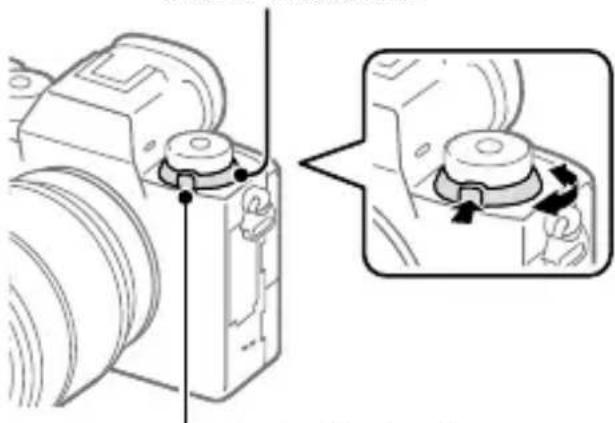
Focus mode dial lock release button
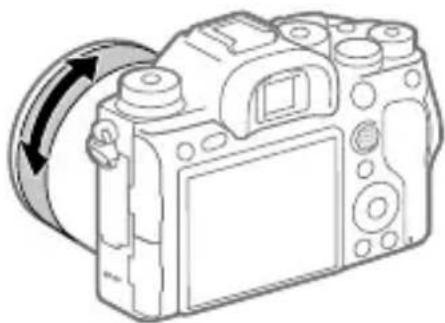
2 Rotate the focusing ring to achieve sharp focus.
- When you rotate the focusing ring, the focus distance is displayed on the screen. The focus distance is not displayed when the Mount Adaptor (sold separately) is attached.
3 Press the shutter button fully down to shoot an image.
Note
- When you use the viewfinder, adjust the diopter level to obtain the correct focus on the viewfinder (page 10).
- The displayed focus distance is just a reference.
Direct manual focus (DMF)
You can make fine adjustments manually after performing auto focusing, letting you focus on a subject more quickly than when using the manual focus from the beginning. This is convenient in situations such as macro shooting.
1 Turn the focus mode dial while pressing the focus mode dial lock release button and select DMF.
2 Press the shutter button halfway down to focus automatically.
3 Keep the shutter button pressed halfway down, and then rotate the focusing ring to achieve a sharper focus.
- When you rotate the focusing ring, the focus distance is displayed on the screen. The focus distance is not displayed when the Mount Adaptor (sold separately) is attached.
4 Press the shutter button fully down to shoot an image.
Shutter setting
Shutter Type
You can set whether to shoot with a mechanical shutter or an electronic shutter.
MENU 2(Camera Settings 2) [Shutter Type] desired setting.
Auto: The shutter type is automatically switched based on the shooting conditions and shutter speed.
Mechanical Shutter: Shoot with the mechanical shutter only.
Electronic Shutter: Shoot with the electronic shutter only.
Hint
-
In the following situations, set the Shutter Type] to [Auto] or [Electronic Shutter].
-
When shooting with a high-speed shutter in a bright environment such as outside in bright sunlight, the beach, or snowy mountains.
-
When you want to increase the speed of continuous shooting.
Note
- In rare cases, the shutter sound may be produced when the power is turned off even if the [Shutter Type] is set to [Electronic Shutter]. However, this is not a malfunction.
-
In the following situations, the mechanical shutter will be activated even if the [Shutter Type] is set to [Electronic Shutter].
-
When capturing a standard white color for the custom white balance
-
[Face Registration]
-
The following functions are unavailable when the Shutter Type] is set to [Electronic Shutter].
-Flash shooting
Long Exposure NR
-Bulb shooting
Using the electronic shutter
Using the electronic shutter lets you perform various kinds of shooting that are difficult to achieve using the mechanical shutter, such as shooting without sounds or shaking, shooting with a super-fast shutter, and blackout-free shooting*.
- During blackout-free shooting, the screen does not black out or drop frames and you can keep looking at the subject through the viewfinder or monitor while shooting images.
Shutter types and camera performance
The camera's shutter speed range, shutter sound, occurrence of blackout, and availability of the anti-flicker shooting or the flash for each setting are as follows:
GB
| Shutter Type | |||
| Auto | Mechanical Shutter | Electronic Shutter | |
| Shutter speed | Single shooting: BULB - 1/32000*1*2 Continuous shooting: 1/8 - 1/32000*1*2 | Single shooting: BULB - 1/8000 Continuous shooting: 30 - 1/8000 | Single shooting: 30 - 1/32000*1*2 Continuous shooting: 1/8 - 1/32000*1*2 |
| Shutter sound | Single shooting: Mechanical shutter sound Continuous shooting: Electronic shutter sound | Mechanical shutter sound | Electronic shutter sound |
| Blackout | Single shooting: Occurs Continuous shooting: Blackout-free*3 | Occurs | Blackout-free*3 |
| Flash | Available*4 | Available Unavailable | |
| Anti-flicker shooting | Available*5 | Available Unavailable | |
1 The maximum shutter speed is 1/16000 second when the shooting mode is not set to S (Shutter Priority) or M (Manual Exposure), or during bracket shooting with a setting other than [WB bracket] or [DRO Bracket].
2 The next value after 1/16000 second is 1/32000 second when the shooting mode is set to S (Shutter Priority) or M (Manual Exposure).
3 When [Shoot. Start Disp.] is set to [On], blackout occurs only when the first image is shot (page 44).
4 The maximum shutter speed is 1/8000 second when performing continuous shooting with the flash.
*5 The maximum shutter speed is 1/8000 second when [Anti-flicker Shoot.] is set to [On].
Advanced shooting using the electronic shutter: Shooting without shutter sound
You can use the electronic shutter to shoot without shutter sound.
① MENU 2 (Camera Settings 2) [Shutter Type] [Electronic Shutter].
- Select [Electronic Shutter] or [Auto] for continuous shooting.
② MENU 2 (Camera Settings 2) [Audio signals] [Off] or [On: other than e-shut].
Advanced shooting using the electronic shutter: Blackout-free continuous shooting
You can use the electronic shutter to perform continuous shooting with focus and exposure tracking, without the screen blacking out.
① MENU 2 (Camera Settings 2) [Shutter Type] [Auto] or [Electronic Shutter].
② Turn the mode dial and select F(Program Auto), A (Aperture Priority), S(Shutter Priority), or M (Manual Exposure), then set the shutter speed and aperture value. (For example: shutter speed of 1/250 second and aperture value of F2.8)
- The product will not adjust the exposure in manual exposure mode when [ISO] is set to other than [ISO AUTO].
③ Turn the drive mode dial and select
H (Continuous Shooting: Hi),
M(Continuous Shooting: Mid), or
L (Continuous Shooting: Lo).
④ Turn the focus mode dial and select AF-C (Continuous AF), then start shooting images.
Hint
- If you want to display the timing of shooting on the screen during blackout-free shooting, adjust the setting using MENU 2 (Camera Settings 2) [Shoot. Timing Disp.].
- To take advantage of the performance of the camera, we recommend that you use a UHS-II memory card.
GB
Note
- When shooting without the shutter sound, do so on your own responsibility, with sufficient consideration to the privacy and portrait rights of the subject.
- Even if you set the camera to shoot without the shutter sound, it will not be completely silent.
- Even if you set the camera to shoot without the shutter sound, the aperture and focus will make sounds.
- When using a lens compatible with Aperture Drive in AF, sound from the aperture drive may be audible during continuous shooting if [Aperture Drive in AF] is set to [Focus Priority].
- If you set [Audio signals] to [Off], the camera will not beep when the subject comes into focus or when the self-timer is in operation.
- During blackout-free shooting, the slower the shutter speed, the lower the refresh rate of the screen. If you want the screen display to be smooth in order to track the subject, set a shutter speed faster than 1/125 second.
- The electronic shutter operates differently when a Mount Adaptor is attached to the camera.
Displaying the release timing (Shoot. Timing Disp.)
Sets whether or not to display marks (such as a frame) on the screen while shooting. This function is useful in situations where it is difficult to determine the timing of shooting just by looking at the screen, such as when the shutter sound is turned off.
MENU 2(Camera Settings 2) [Shoot. Timing Disp.] desired setting.
On: Type 1: Displays a frame (dark color) around the focusing frame.
On: Type 2: Displays a frame (light color) around the focusing frame.
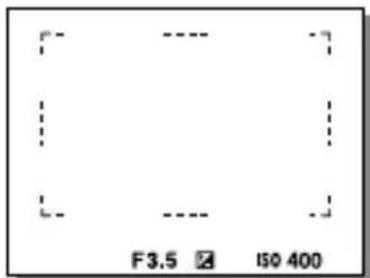
On: Type 3: Displays (dark color) in the four corners of the screen.
On: Type 4: Displays (light color) in the four corners of the screen.
Off: Does not display the shutter release timing during blackout-free shooting.
![SONY Alpha A9 II - MENU 2(Camera Settings 2) [Shoot. Timing Disp.] desired setting. - 1](/content/2026/03/483534/images/87a76c445b7bd82577917475f3e3a06b69394ad2f4bd60fc581c172a7c88e817.jpg)
[On: Type 1]/[On: Type 2] (Example: [Focus Area] is set to [Center])
![SONY Alpha A9 II - MENU 2(Camera Settings 2) [Shoot. Timing Disp.] desired setting. - 2](/content/2026/03/483534/images/f2616d26b29641430aea17900ca640501df0fa80b5095f8eae2e117084c6dd5c.jpg)
[On: Type 3]/[On: Type 4]
Shoot. Start Disp.
Sets whether or not to indicate the shutter release timing with a black screen during blackout-free shooting. The black screen makes it easier to visually confirm when the shutter is released.
MENU 2(Camera Settings 2) [Shoot. Start Disp.] desired setting.
On: The screen blacks out when shooting the first image during blackout-free shooting.
Off: The screen does not black out when shooting the first image during blackout-free shooting.
Continuous shooting
Shoots images continuously while you press and hold down the shutter button.
Turn the drive mode dial and select the desired mode.
- Turn the drive mode dial while pressing the drive mode dial lock release button.

Continuous Shooting: Hi / Continuous Shooting: Mid /
L Continuous Shooting: Lo
| Shutter Type | ||
| Mechanical Shutter Auto | /Electronic Shutter* 1 | |
| Continuous Shooting: Hi | 10 images per second at maximum*2 | 20 images per second at maximum *2*3*4 |
| Continuous Shooting: Mid | 8 images per second at maximum*2 | 10 images per second at maximum*2 |
| Continuous Shooting: Lo | 3 images per second at maximum | 5 images per second at maximum*2 |
GB
1 The value shown is the shooting speed when [Aperture Drive in AF] is set to [Standard]. When [Aperture Drive in AF] is set to [Focus Priority], the speed of continuous shooting may become slower.
^2 The focus is locked to the setting in the first shot when [Aperture Drive in AF] is set to [Standard] or [Silent Priority], and the F-value is greater than F16.
3 When the Focus Mode is set to AF-C (Continuous AF), the speed of continuous shooting varies depending on the attached lens. For details, check the support page on compatible lenses.
4 During uncompressed RAW shooting, 12 images are shot per second at maximum.
Hint
-
To continuously adjust the focus and exposure during continuous shooting, set as follows:
-
[Focus Mode]: [Continuous AF]
-
[AEL w/ shutter]: [Off] or [Auto]
Note
- The shooting speed during continuous shooting becomes slower when [RAW File Type] is set to [Uncompressed].
- Continuous shooting is unavailable in the following situations:
- [Picture Effect] is set to [Rich-tone Mono.].
- [DRO/Auto HDR] is set to [Auto HDR].
- The speed of continuous shooting decreases when you shoot with a flash.
Displaying continuous shooting remaining time indicator (Cont. Shoot. Length)
Sets whether to display an indicator of the remaining time for which continuous shooting can be performed at the same shooting speed.
MENU Camera Settings 2) [Cont. Shoot. Length] desired setting.
Always Display: Always displays the indicator when the drive mode is set to [Cont. Shooting].
Shoot.-Only Display: Displays the indicator only while continuous shooting is performed.
Not Displayed: Does not display the indicator.
![SONY Alpha A9 II - MENU Camera Settings 2) [Cont. Shoot. Length] desired setting. - 1](/content/2026/03/483534/images/81019bd45695355d8ffb8b7939352b68a3ac6c40cc44a652c62199263ab84c52.jpg)
Hint
- When the internal camera memory for buffering is full, "SLOW" will be displayed and the continuous shooting speed will decrease.
Using touch function
Touch Operation
Sets whether or not to activate touch operations on the monitor.
MENU (Setup) [Touch Operation] desired setting.
On: Activates the touch operation.
Off: Deactivates the touch operation.
Touch Panel/Pad
Touch operations when shooting with the monitor are referred to as "touch panel operations," and touch operations when shooting with the viewfinder are referred to as "touch pad operations." You can select whether to activate touch panel operations or touch pad operations.
MENU (Setup) [Touch Panel/Pad] desired setting.
Touch Panel+Pad: Activates both the touch panel operations when shooting with the monitor and touch pad operations when shooting with the viewfinder.
Touch Panel Only: Activates only the touch panel operations when shooting with the monitor.
Touch Pad Only: Activates only the touch pad operations when shooting with the viewfinder.
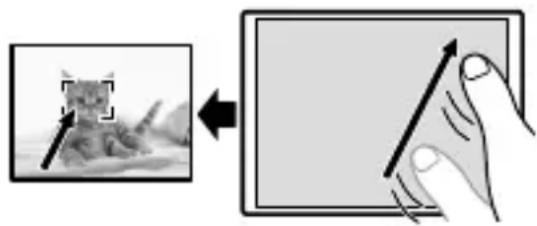
Touch Focus
[Touch Focus] allows you to specify a position where you want to focus using touch operations. This function is available when [Focus Area] is set to a parameter other than [Flexible Spot], [Expand Flexible Spot], [Tracking: Flexible Spot] or [Tracking: Expand Flexible Spot]. Select MENU (Setup) [Touch Operation] [On] beforehand.
MENU Camera Settings 2) [Func. of Touch Operation] [Touch Focus].
■ Specifying the position where you want to focus in the still image mode
You can specify the position where you want to focus using touch operations. After touching the monitor and specifying a position, press the shutter button halfway down to focus.
① Touch the monitor.
- When shooting with the monitor, touch the position where you want to focus.
- When shooting with the viewfinder, you can move the position of the focus by touching and dragging on the monitor while looking through the viewfinder.
- To cancel focusing with touch operations, touch or press the center of the control wheel if shooting with the monitor, and press the center of the control wheel if shooting with the viewfinder.
② Press the shutter button halfway down to focus.
- Press the shutter button all the way down to shoot images.
■ Specifying the position where you want to focus in the movie recording mode (spot focus)
The camera will focus on the touched subject. Spot focus is not available when shooting with the viewfinder.
Touch the subject on which you want to focus before or during recording.
- When you touch the subject, the focus mode temporarily switches to manual focus and the focus can be adjusted using the focus ring.
- To cancel spot focus, touch or press the center of the control wheel.
Hint
-
In addition to the touch focus function, touch operations such as the following are also available.
-
When [Focus Area] is set to [Flexible Spot], [Expand Flexible Spot],
[Tracking: Flexible Spot], or [Tracking: Expand Flexible Spot], the focusing frame can be moved using touch operations.
- When the [Focus Mode] is set to [Manual Focus], the focus magnifier can be used by double-tapping the monitor.
GB
Note
-
The touch focus function is not available in the following situations:
-
When [Focus Mode] is set to [Manual Focus]
- When using the digital zoom
- When using the LA-EA2 or LA-EA4 Mount Adaptor (sold separately)
Touch Tracking
You can use touch operations to select a subject you want to track in the still image and movie recording modes. Select MENU (Setup) [Touch Operation] [On] in advance.
1 MENU camera Settings 2) [Func. of Touch Operation] [Touch Tracking].
2 Touch the subject that you want to track on the monitor.
Tracking will start.
- When shooting with the viewfinder, you can use the touch pad to select a subject you want to track.
3 Press the shutter button halfway down to focus.
- Press the shutter button all the way down to shoot images.
Hint
- To cancel tracking, touch press the center of the control wheel.
Note
-
[Touch Tracking] is unavailable in the following situations:
-
When shooting movies with [Record Setting] set to [120p] / [100p] .
- When [Focus Mode] is set to [Manual Focus].
- When using the Smart Zoom, Clear Image Zoom and Digital Zoom
- When using the LA-EA2 or LA-EA4 Mount Adaptor (sold separately)
Selecting a still image size/image quality

File Format
Sets the file format for still images.
MENU 1(Camera Settings 1) [File Format] desired setting.
RAW: Digital processing is not performed on this file format. Select this format to process images on a computer for professional purposes.
RAW & JPEG: A RAW image and a JPEG image are created at the same time. This is suitable when you need two image files, a JPEG for viewing, and a RAW for editing.
JPEG: The image is recorded in the JPEG format.
![SONY Alpha A9 II - MENU 1(Camera Settings 1) [File Format] desired setting. - 1](/content/2026/03/483534/images/38198b2667f98c77bbd41e453f84d1009b6067d11076e521bf41ee0ae6829adb.jpg)
JPEG Quality
Selects the JPEG image quality when [Format] is set to [RAW & JPEG] or [JPEG].
MENU 1(Camera Settings 1) [JPEG Quality] desired setting.
Extra fine/Fine/Standard: Since the compression rate increases from [Extra fine] to [Fine] to [Standard], the file size decreases in the same order. This allows more files to be recorded on one memory card, but the image quality is lower.
![SONY Alpha A9 II - MENU 1(Camera Settings 1) [JPEG Quality] desired setting. - 1](/content/2026/03/483534/images/c0bc5026aeb1b4373dcabf38f8a63d499d2d618ed1cc2d82c661fa289e24a3fb.jpg)
JPEG Image Size
The larger the image size, the more detail will be reproduced when the image is printed on large-format paper. The smaller the image size, the more images can be recorded.
MENU 1(Camera Settings 1) [JPEG Image Size] desired setting.
When recording in the full-frame size
| When [Aspect Ratio] is set to 3:2 | |
| L: 24M | 6000×4000 pixels |
| M: 10M | 3936×2624 pixels |
| S: 6.0M | 3008×2000 pixels |
| When [ Aspect Ratio] is set to 4:3 | |
| L: 21M | 5328×4000 pixels |
| M: 9.2M | 3488×2624 pixels |
| S: 5.3M | 2656×2000 pixels |
| When [Aspect Ratio] is set to 16:9 When [ | |
| L: 20M | 6000×3376 pixels |
| M: 8.7M | 3936×2216 pixels |
| S: 5.1M | 3008×1688 pixels |
| Aspect Ratio] is set to 1:1 | |
| L: 16M | 4000×4000 pixels |
| M: 6.9M | 2624×2624 pixels |
| S: 4.0M | 2000×2000 pixels |
When recording in the APS-C-equivalent size
| When [Aspect Ratio] is set to 3:2 | |
| L: 10M | 3936×2624 pixels |
| M: 6.0M | 3008×2000 pixels |
| S: 2.6M | 1968×1312 pixels |
| When [ Aspect Ratio] is set to 4:3 | |
| L: 9.2M | 3488×2624 pixels |
| M: 5.3M | 2656×2000 pixels |
| S: 2.3M | 1744×1312 pixels |
| When [Aspect Ratio] is set to 16:9 | |
| L: 8.7M | 3936×2216 pixels |
| M: 5.1M | 3008×1688 pixels |
| S: 2.2M | 1968×1112 pixels |
| When [ Aspect Ratio] is set to 1:1 | |
| L: 6.9M | 2624×2624 pixels |
| M: 4.0M | 2000×2000 pixels |
| S: 1.7M | 1312×1312 pixels |
Note
- When file Format] is set to [RAW] or [RAW & JPEG], the image size for RAW images corresponds to "L."
APS-C/Super 35mm
Sets whether to record in APS-C-equivalent size for still images and in Super 35mm-equivalent size for movies. If you select [On] or [Auto], you can use an APS-C size dedicated lens on this product.
MENU 1(Camera Settings 1) [APS-C/Super 35mm] desired setting.
On: Records in either APS-C-equivalent size or Super 35mm-equivalent size.
Auto: Automatically sets the capture range according to the lens.
Off: Always captures 35mm full-frame image sensor pictures.
Note
- When you attach an APS-C compatible lens and set [APS-C/Super 35mm] to [Off], you may not achieve the desired shooting results.
- When you set [APS-C/Super 35mm] to [On], the angle of view will be the same as when shooting with an APS-C size image sensor.
Changing settings for movie recording
File Format
Selects the movie file format.
MENU 2(Camera Settings 2) [File Format] desired setting.
| File Format Characteristics | ||
| XAVC S 4K | Records movies in 4K resolution (3840×2160). | You can save movies on a computer using the PlayMemories Home software. |
| XAVC S HD | Records movies in crispier quality than AVCHD with larger amounts of data. | |
| AVCHD | The AVCHD format has a high degree of compatibility with storage devices other than computers. | You can save movies on a computer or create a disc that supports this format using the PlayMemories Home software. |
For details on memory cards that can be used for these formats, refer to page 88.
Note
- When [File Format] is set to [AVCHD], the file size of movies is limited to approx. 2 GB. If the movie file size reaches approx. 2 GB during recording, a new movie file will be created automatically.
Selects the frame rate and bit-rate for movie recording.
MENU 2(Camera Settings 2) [Record Setting] desired setting.
- The higher the bit-rate, the higher the image quality.
- For estimates of the maximum recordable movie time with each recording setting, refer to page 90.
When [he Format] is set to [XAVCS 4K]
| Record Setting Bit-rate Description | ||
| 30p 100M/25p 100M | Approx. 100 Mbps | Records movies in 3840×2160 (30p/25p). |
| 30p 60M/25p 60M | Approx. 60 Mbps | Records movies in 3840×2160 (30p/25p). |
| 24p 100M* | Approx. 100 Mbps | Records movies in 3840×2160 (24p). |
| 24p 60M* | Approx. 60 Mbps | Records movies in 3840×2160 (24p). |
- Only when [NTSC/PAL Selector] is set to NTSC
GB
When [Format] is set to [XAVCSHD]
| Record Setting Bit-rate Description | |
| 60p 50M/50p 50M | Approx. 50 Mbps Records movies in 1920×1080 (60p/50p). |
| 60p 25M/50p 25M | Approx. 25 Mbps Records movies in 1920×1080 (60p/50p). |
| 30p 50M/25p 50M | Approx. 50 Mbps Records movies in 1920×1080 (30p/25p). |
| 30p 16M/25p 16M | Approx. 16 Mbps Records movies in 1920×1080 (30p/25p). |
| 24p 50M* | Approx. 50 Mbps Records movies in 1920×1080 (24p). |
| 120p100M/100p100M | Approx. 100 Mbps Records high-speed movies in 1920×1080 (120p/100p). You can record movies in 120 fps or 100 fps. • You can create smoother slow-motion movies by using compatible editing devices. |
| 120p 60M/100p 60M | Approx. 60 Mbps Records high-speed movies in 1920×1080 (120p/100p). You can record movies in 120 fps or 100 fps. • You can create smoother slow-motion movies by using compatible editing devices. |
- Only when [NTSC/PAL Selector] is set to NTSC
When [File Format] is set to [AVCHD]
| Record Setting Bit-rate Description | ||
| 60i 24M (FX)/50i 24M (FX) | 24 Mbps at maximum | Records movies in 1920×1080 (60i/50i). |
| 60i 17M (FH)/50i 17M (FH) | Approx. 17 Mbps on average | Records movies in 1920×1080 (60i/50i). |
Note
- Creating an AVCHD recording disc from movies that were recorded with [60i 24M (FX)]/[50i 24M (FX)] as the [ Record Setting] takes a long time because the image quality of movies is converted. If you want to store movies without converting them, use a Blu-ray Disc.
-
[120p]/[100p] cannot be selected for the following settings.
-
[Intelligent Auto]
-
In full-frame shooting, the angle of view will be narrower under the following conditions:
-
When File Format] is set to [XAVC S 4K] and [Record Setting] is set to [30p]
GB
Using the Wi-Fi/One-touch (NFC)/Bluetooth/wired LAN functions
You can perform the following operations using the camera's Wi-Fi, NFC One-touch, Bluetooth, and wired LAN functions.
- Saving images to a computer
- Transferring images from the camera to a smartphone
- Using a smartphone as a remote control for the camera
Viewing still images on a TV - Recording location information from a smartphone to images
- Transferring images to the FTP server
For details, refer to the "Help Guide" (page 2).
Installing Imaging Edge Mobile
Imaging Edge Mobile is required to connect the camera and a smartphone. If Imaging Edge Mobile is already installed on your smartphone, be sure to update it to the latest version.
For details on Imaging Edge Mobile, refer to the support page (https://www.sony.net/iem/).

Note
- To use the camera's NFC One-touch function, an NFC-enabled smartphone or tablet is required.
- The Wi-Fi functions introduced in this manual are not guaranteed to operate on all smartphones or tablets.
- Depending on future version upgrades, the operational procedures or screen displays are subject to change without notice.
Recording location information to captured images
By using Imaging Edge Mobile, you can obtain location information from a connected smartphone (via Bluetooth communication) and record it to captured images.
For details on the operating procedure, refer to the "Help Guide" (page 2) or the following support page.

https://www.sony.net/iem/btg/
GB
Transferring images to the FTP server
You can use the camera's Wi-Fi function or wired LAN to transfer images to the FTP server.
For details, refer to the "FTP Help Guide."
https://rd1.sony.net/help/di/ftp/h_zz/

- Basic knowledge of FTP servers is required.
Connecting the camera to a wireless access point
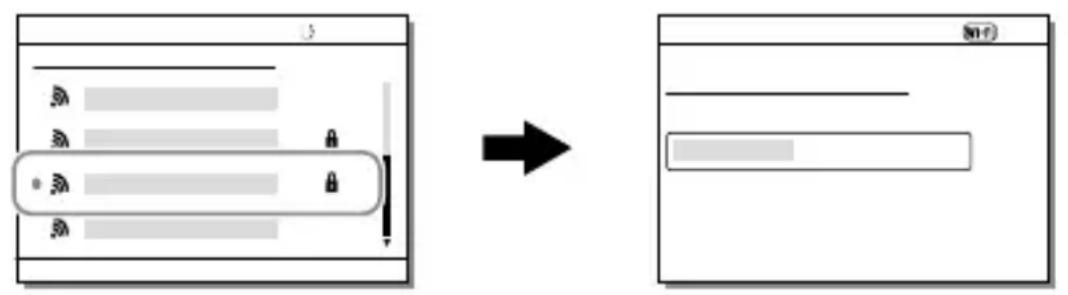
Connect the camera to your wireless access point. Before starting the procedure, make sure you have the SSID (name of the access point) and password of your wireless access point with you.
1 MENU (Network) [Wi-Fi Settings] [Access Point Set.].
2 Use the control wheel to select the access point to which you want to connect. Press the center of the control wheel and enter the password for the wireless access point, then select [OK].
Note
- If a connection is not established, see the wireless access point operating instructions or contact the administrator of the access point. To save images to a computer, install PlayMemories Home on your computer.
PlayMemories Home
https://www.sony.net/pm/
Introduction to computer software
We offer the following computer software to enhance your enjoyment of photos/movies. Access one of the following URLs using your Internet browser and then download the software by following the onscreen instructions.
If one of these software is already installed on your computer, update it to the latest version before use.
For details on the software for computers, refer to the following URL: https://www.sony.net/disoft/
GB
You can check the recommended operating environment for the software from the following URL:
https://www.sony.net/pcenv/
Imaging Edge
Imaging Edge is a software suite that includes functions such as remote shooting from a computer, and adjusting or developing RAW images recorded with the camera.
For details on Imaging Edge, refer to the following URL:
https://www.sony.net/iox/
PlayMemories Home
PlayMemories Home allows you to import still images and movies to your computer and view or use them.
You need to install PlayMemories Home to import XAVC S movies or AVCHD movies to your computer.
You can access the download website directly from the following URL:
https://www.sony.net/pm/
- When you connect the camera to your computer, new functions may be added to PlayMemories Home. Connecting the camera to your computer is therefore recommended even if PlayMemories Home has already been installed on the computer.
Remote Camera Tool
Remote Camera Tool is software for PC remote shooting using a wired LAN. You can change the camera settings and shoot images from a computer by connecting the camera to a computer or switching hub using a LAN cable.
For details on Remote Camera Tool, refer to the following URL:
https://support.d-imaging.sony.co.jp/app/remotecameratool/l/index.php
Using MENU items
You can change settings related to all the camera operations including shooting, playback, and operating method. You can also execute camera functions from the MENU.
1 Press the MENU button to display the menu screen.
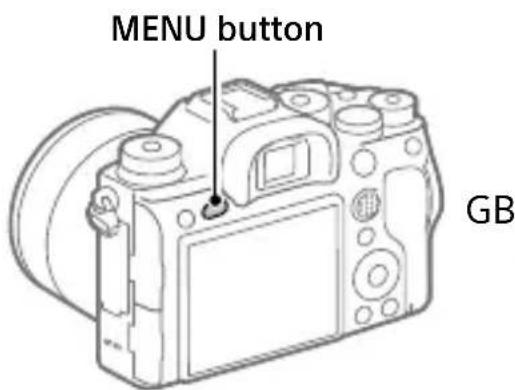
2 Select the desired setting you want to adjust using the top/bottom/left/right sides of the control wheel or by turning the control wheel, and then press the center of the control wheel.

- Select a MENU tab at the top of the screen, and press the left/right side of the control wheel to move to another MENU tab.
- You can move to another MENU tab by turning the front dial.
- You can move to the next MENU tab by pressing the Fn button.
- You can go back to the previous screen by pressing the MENU button.
3 Select the desired setting value, and press the center to confirm your selection.
Hint
- You can display the menu screen by assigning the [MENU] function to a custom key using [Custom Key] or [Custom Key], and then pressing that key.
List of MENU items
For details on each MENU items, refer to the reference page in the last column or the Help Guide.
1(Camera Settings 1)
Red tab
| Quality/Image Size | ||
| File Format | Sets the file format for still images. ([RAW] / [JPEG], etc.) | 51 |
| RAW File Type | Selects the file type for RAW images. Help Guide | |
| JPEG Quality | Selects the JPEG image quality for [RAW & JPEG] or [JPEG] under [File Format]. | 51 |
| JPEG Image Size | Selects the size of still images. (L / M / S) | 52 |
| Aspect Ratio | Selects the aspect ratio for still images. | Help Guide |
| APS-C/Super 35mm | Sets whether to record in APS-C-equivalent size for still images and Super 35 mm-equivalent size for movies. | 53 |
| Long Exposure NR | Sets noise reduction processing for shots with a shutter speed of 1 second or longer. | Help Guide |
| High ISO NR | Sets noise reduction processing for high-sensitivity shooting. | Help Guide |
| Color Space | Changes the color space (range of reproducible colors). | Help Guide |
| Lens Comp. | Selects the type of lens compensation. | Help Guide |
| Shoot Mode/Drive | ||
| Self-timer Type | When shooting with the self-timer, sets how many seconds elapse from when you press the shutter button until when the image is recorded and how many images are recorded. | Help Guide |
| Bracket Settings | Sets self-timer shooting in the bracket mode, bracket type, and the shooting order for exposure bracketing or white balance bracketing. | Help Guide |
| Interval Shoot Func. | Configs settings for interval shooting. | Help Guide |
| MR RecII | Calls up settings pre-registered to [MR Memory]. | Help Guide |
| MR Memory | Registers the desired modes and camera settings. | Help Guide |
| MR Select Media | Selects the memory card slot from which settings are recalled or to which settings are registered for M1 through M4. | Help Guide |
| Reg.Custom Shoot Set | Assign functions to the custom key to recall when shooting. | Help Guide |
| AF | ||
| Priority Set in AF-S | Sets the timing of the shutter release when [Focus Mode] is set to [Single-shot AF] or [DMF] with a still subject. | Help Guide |
| Priority Set in AF-C | Sets the timing of the shutter release when [Focus Mode] is set to [Continuous AF] with a moving subject. | Help Guide |
| Focus Area | Selects the area of focus. ([Wide] / [Flexible Spot], etc.) | 35 |
| Focus Settings | Configs settings for focusing using the front dial, rear dial or control wheel. | Help Guide |
| Focus Area Limit | Limits the types of available focus area settings in advance. | Help Guide |
GB
| Switch V/H AF Area | Sets whether to adjust the [Focus Area] and the position of the focusing frame based on the camera's position (horizontal or vertical). | Help Guide |
| AF Illuminator | Sets the AF illuminator, which provides light to aid focusing in dark scenes. | Help Guide |
| Face/Eye AF Set. | Configs settings such as whether the camera focuses with priority on human faces or eyes. | Help Guide |
| AF Tracking Sens. | Sets the AF tracking sensitivity for the still image mode. | Help Guide |
| Aperture Drive in AF | Changes the aperture drive system to prioritize the auto-focusing tracking performance or to prioritize silence. | Help Guide |
| AF w/ shutter | Sets whether to perform auto focusing when the shutter button is pressed halfway down. This is useful when you want to adjust the focus and exposure separately. | Help Guide |
| Pre-AF | Sets whether or not to perform auto focus before the shutter button is half pressed. | Help Guide |
| Eye-Start AF | Sets whether to use auto focus when you look through the viewfinder if an LA-EA2/LA-EA4 Mount Adaptor (sold separately) is attached. | Help Guide |
| AF Area Registration | Sets whether to move the focusing frame to a preassigned position when shooting still images. | Help Guide |
| Del. Regist. AF Area | Deletes the focusing frame position information that was registered using [AF Area Registration]. | Help Guide |
| Focus Frame Color | Sets the color of the frame indicating the focusing area. | Help Guide |
| AF Area Auto Clear | Sets whether the focus area is displayed all the time or disappears automatically shortly after focusing. | Help Guide |
| Disp. cont. AF area | Sets whether or not to display the focus area in [Continuous AF] mode. | Help Guide |
| Phase Detect. Area | Sets phase detection AF area. Help | Guide |
| Circ. of Focus Point | Sets whether to allow the focusing frame to jump from one end to the other when you move the focusing frame. | Help Guide |
| AF Micro Adj. | Finely adjusts the autofocused position, when using the LA-EA2 or LA-EA4 Mount Adaptor (sold separately). | Help Guide |
| Exposure | ||
| Exposure Comp. | Compensates for the brightness of the entire image. | Help Guide |
| Reset EV Comp. | Sets whether to maintain the exposure value set using [Exposure Comp.] when you turn off the power when the exposure compensation dial position is set to “0.” | Help Guide |
| ISO Setting | Sets functions related to ISO sensitivity. ([ISO] / [ISO AUTO Min. SS], etc.) | Help Guide |
| Metering Mode | Selects the method for measuring brightness. ([Multi] / [Spot], etc.) | Help Guide |
| Face Priority in Multi Metering | Sets whether the camera measures brightness based on detected faces when [Metering Mode] is set to [Multi]. | Help Guide |
| Spot Metering Point | Sets whether to coordinate the spot metering point with the focus area when [Focus Area] is set to [Flexible Spot], etc. | Help Guide |
| Exposure step | Selects the size of the increment step for shutter speed, aperture, and exposure compensation values. | Help Guide |
GB
| AEL w/ shutter | Sets whether to lock the exposure when the shutter button is pressed halfway down. This is useful when you want to adjust the focus and exposure separately. | Help Guide |
| Exposure Std. Adjust | Adjusts the standard for the correct exposure value for each metering modes. | Help Guide |
| Flash | ||
| Flash Mode | Sets the flash settings. Help | Guide |
| Flash Comp. | Adjusts the intensity of flash output. Help Guide | |
| Exp.comp.set | Sets whether to reflect exposure compensation value to flash compensation. | Help Guide |
| Wireless Flash | Sets whether to shoot with the wireless flash. | Help Guide |
| Red Eye Reduction | Reduces the red-eye phenomenon when using flash. | Help Guide |
| Color/WB/Img. Processing | ||
| White Balance | Corrects the tone effect of the ambient light to shoot whitish objects in a white tone. ([Auto] / [Daylight], etc.) | Help Guide |
| Priority Set in AWB | Selects which tone to prioritize when shooting under lighting conditions such as incandescent light with [White Balance] set to [Auto]. | Help Guide |
| DRO/Auto HDR | Analyzes the contrast of light and shadow between the subject and the background by dividing the image into small areas, and creates an image with the optimal brightness and gradation. | Help Guide |
| Creative Style | Selects the desired image processing. You can also adjust contrast, saturation, and sharpness. ([Vivid] / [Portrait], etc.) | Help Guide |
| Picture Effect | Shoots images with a texture unique to the selected effect. ([Toy Camera] / [High Contrast Mono.), etc.) | Help Guide |
| Shutter AWB Lock | Sets whether to lock the white balance while the shutter button is pressed in the auto white balance mode. | Help Guide |
| Focus Assist | ||
| Focus Magnifier | Enlarges the image before shooting so that you can check the focus. | Help Guide |
| Focus Magnif. Time | Sets the length of time the image will be shown in an enlarged form. | Help Guide |
| Initial Focus Mag. | Sets the initial magnification scale when using [Focus Magnifier]. | Help Guide |
| AF in Focus Mag. | Sets whether or not to autofocus when an enlarged image is being displayed. While the enlarged image is being displayed, you can focus within a smaller area than the flexible spot. | Help Guide |
| MF Assist | Displays an enlarged image when focusing manually. | Help Guide |
| Peaking Setting | Sets the peaking function, which enhances the outline of in-focus areas when focusing manually. | Help Guide |
| Shooting Assist | ||
| Anti-flicker Shoot. | Detects flickering/blinking from artificial light sources such as fluorescent lighting and times the shooting of images to moments when flickering will have less of an impact. | Help Guide |
| Face Registration | Registers or changes the person to be given priority when focusing. | Help Guide |
GB
| Regist. Faces Priority | Detects the registered face with higher priority using [Face Registration]. | Help Guide |
2(Camera Settings 2)
Purple tab
| Movie | ||
| Exposure Mode | Sets the exposure mode when shooting movies. | Help Guide |
| S&Q Exposure Mode | Sets the exposure mode when shooting slow-motion/quick-motion movies. | Help Guide |
| File Format | Selects the movie file format. ([XAVC S 4K] / [AVCHD], etc.) | 54 |
| Record Setting | Selects a frame-rate and bit-rate for the movie. | 55 |
| S&Q Settings | Changes the settings for slow-motion and quick-motion movie shooting. | Help Guide |
| Proxy Recording | Records low-bit-rate proxy files simultaneously when recording XAVC S movies. | Help Guide |
| AF drive speed | Switches focusing speed when using autofocus in movie mode. | Help Guide |
| AF Tracking Sens. | Sets the AF tracking sensitivity for the movie mode. | Help Guide |
| Auto Slow Shutter | Sets the function that automatically adjusts the shutter speed following the brightness of the environment in movie mode. | Help Guide |
| Initial Focus Mag. | Sets the initial magnification scale when using [Focus Magnifier] in movie mode. | Help Guide |
| Audio Recording | Sets whether to record audio when shooting a movie. | Help Guide |
| Audio Rec Level | Adjusts the audio recording level during movie recording. | Help Guide |
| Audio Level Display | Sets whether to display the audio level. | Help Guide |
| Audio Out Timing | Sets the timing of audio output during the movie recording. | Help Guide |
| Wind Noise Reduct. | Reduces wind noise during movie recording. | Help Guide |
| Marker Display | Sets whether to display markers on the monitor when recording movies. | Help Guide |
| Marker Settings | Sets which markers to display on the monitor when recording movies. | Help Guide |
| Video Light Mode | Sets the illumination setting for the HVL-LBPC LED light (sold separately). | Help Guide |
| Movie w/ shutter | Records movies using the shutter button. | Help Guide |
| Shutter/SteadyShot | ||
| Shutter Type | Sets whether to shoot with a mechanical shutter or an electronic shutter. | 40 |
| e-Front Curtain Shutter | Sets whether to use the electronic front curtain shutter function. | Help Guide |
| Release w/o Lens | Sets whether to release the shutter when the lens is not attached. | Help Guide |
| Release w/o Card | Sets whether to release the shutter when a memory card is not inserted. | Help Guide |
| SteadyShot | Sets whether to activate SteadyShot for shooting. | Help Guide |
| SteadyShot Settings | Sets SteadyShot settings. Help | Guide |
| Zoom | ||
| Zoom | Sets the zoom scale for zoom functions other than the optical zoom. | Help Guide |
| Zoom Setting | Sets whether to use the Clear Image Zoom and Digital Zoom when zooming. | Help Guide |
| Zoom Ring Rotate | Assigns the zoom in/out to the rotational direction of the zoom lens. This function is only available with a power zoom lens that is compatible with this function. | Help Guide |
| Display/Auto Review | ||
| DISP Button | Sets the type of information to be displayed on the monitor or in the viewfinder when the DISP button is pressed. | Help Guide |
| FINDER/MONITOR | Sets the method for switching the display between the viewfinder and the monitor. | Help Guide |
| Finder Frame Rate | Sets the frame rate for the viewfinder when shooting still images. | Help Guide |
| Zebra Setting | Sets the stripes displayed to adjust brightness. | Help Guide |
| Grid Line | Displays grid lines for adjusting the image composition. | Help Guide |
| Exposure Set. Guide | Sets the guide displayed when exposure settings are changed in the shooting screen. | Help Guide |
| Live View Display | Sets whether to reflect settings such as exposure compensation in screen display. | Help Guide |
| Shoot. Start Disp. | Sets whether or not to signal the shutter release timing with a black screen when the first image is shot during blackout-free shooting. | 44 |
| Shoot. Timing Disp. | Sets whether or not to display indicators (such as a frame) on the screen to show if the camera is shooting. | 43 |
| Cont. Shoot. Length | Sets whether to display an indicator of the remaining time for which continuous shooting can be performed at the same shooting speed. | 46 |
| Auto Review | Sets auto review to display the captured image after shooting. | Help Guide |
| Custom Operation | ||
| Custom Key | Assigns functions to the various keys so that you can perform operations more quickly by pressing the keys when shooting still images. | Help Guide |
| Custom Key | Assigns functions to the various keys so that you can perform operations more quickly by pressing the keys when shooting movies. | Help Guide |
| Custom Key | Assigns functions to the keys so that you can perform operations more quickly by pressing the keys when playing back images. | Help Guide |
| Function Menu Set. | Customizes the functions displayed when the Fn (Function) button is pressed. | 20 |
| My Dial Settings | Assigns the desired functions to the dials and the control wheel, and register up to three combinations of settings. | Help Guide |
| Dial Setup | Sets the functions of the front and rear dials when the exposure mode is set to M. Dials can be used for adjusting shutter speed and aperture value. | Help Guide |
| Av/Tv Rotate | Sets the direction of turning the front or rear dial or the control wheel to adjust the aperture value or shutter speed. | Help Guide |
| Dial Ev Comp | Sets whether to compensate the exposure with the front or rear dial. | Help Guide |
| Function Ring (Lens) | Assigns a function to the function ring on the lens. | Help Guide |
| Func. of Touch Operation | Sets which function is activated by touch operations on the monitor. | 48, 49 |
GB
| MOVIE Button | Enables or disables the MOVIE button. | Help Guide |
| Lock Operation Parts | Sets whether to disable the multi- selector, control wheel, or front and rear dials temporarily when the Fn button is pressed and held down. | Help Guide |
| Audio signals | Selects whether the electronic shutter makes a sound or the camera beeps during auto focus and self-timer operations. | Help Guide |

(Network)
Green tab
| Send to Smartphone Func. | Sets movies to be transferred to a smartphone, or transfers images to a smartphone. | Help Guide |
| Send to Computer (Wi-Fi) | Backs up images by transferring them to a computer connected to a network. | Help Guide |
| FTP Transfer Func. | Sets image transfer using FTP and executes it. * Basic knowledge of FTP server is required. | 59 |
| View on TV | Allows you to view images on a network-enabled TV. | Help Guide |
| Ctrl w/ Smartphone | Sets the condition for connecting the camera to a smartphone. | Help Guide |
| PC Remote Function | Configs settings for PC remote shooting. | Help Guide |
| Airplane Mode | Disables wireless communications from the device such as Wi-Fi, NFC, and Bluetooth function. | Help Guide |
| Wi-Fi Settings | Allows you to register your access point and check or change the Wi-Fi connection information. | Help Guide |
| Bluetooth Settings | Configs settings for connecting the camera to a smartphone or a Bluetooth remote commander via a Bluetooth connection. | Help Guide |
| □ Location Info. Link Set. | Obtains location information from the paired smartphone and records it to captured images. | Help Guide |
| Bluetooth Rmt Ctrl | Sets whether or not to use a Bluetooth remote commander. | Help Guide |
| Wired LAN Setting | Sets the wired LAN. Help | Guide |
| Edit Device Name | Changes the device name under Wi-Fi Direct, etc. | Help Guide |
| Import Root Certificate | Imports a root certificate to the camera. | Help Guide |
| Security (IPsec) | Sets whether or not to encrypt communications between the camera and a computer while they are connected via Wi-Fi or a wired LAN. | Help Guide |
| Reset Network Set. | Reset all the network settings. Help | Guide |
(Playback)
Blue tab
| Protect | Protects recorded images against accidental erasure. | Help Guide |
| Rotate | Rotates the image. Help | Guide |
| Delete | Deletes images. Help | Guide |
| Rating | Assigns rating to recorded images on a scale from ★ to ★★★★ | Help Guide |
| Rating Set (Custom Key) | Sets the rating (number of ★) that can be selected using the custom key to which [Rating] has been assigned with [Custom Key]. | Help Guide |
| Specify Printing | Specifies in advance on the memory card which still images to print out later. | Help Guide |
| Voice Memo | Records, plays back, and deletes voice memos. | Help Guide |
| Voice Memo PB Volume | Sets the playback volume for voice memos. | Help Guide |
| Copy | Copies images from the memory card in the memory card slot designated in [Select Playback Media] to the memory card in the other slot. | Help Guide |
| Photo Capture | Captures a chosen scene in a movie to save as a still image. | Help Guide |
| Enlarge Image | Enlarges the playback images. Help | Guide |
| Enlarge Initial Mag. | Sets the initial magnification scale when playing back enlarged images. | Help Guide |
| Enlarge Initial Position | Sets the initial magnification area when playing back enlarged images. | Help Guide |
| Cont. PB for Interval | Continuously plays back images shot using interval shooting. | Help Guide |
| PB Speed for Interval | Sets the playback speed when continuously playing back images with [Cont. PB for Interval]. | Help Guide |
| Slide Show | Plays a slide show. Help | Guide |
| SelectPlayback Media | Selects the memory card slot of the memory card to be played back. | Help Guide |
| View Mode | Plays back images from a specified date or specified folder of still images and movies. | Help Guide |
| Image Index | Displays multiple images at the same time. | Help Guide |
| Display as Group | Sets whether or not to display images shot continuously or shot using interval shooting as a group. | Help Guide |
| Display Rotation | Sets the playback orientation for images shot vertically. | Help Guide |
| Image Jump Setting | Sets which dial and method to use for jumping between images during playback. | Help Guide |

(Setup)
Yellow tab
| Monitor Brightness | Adjusts the brightness of the screen. | Help Guide |
| Viewfinder Bright. | Sets the brightness of the viewfinder. | Help Guide |
| Finder Color Temp. | Sets the color temperature of the viewfinder. | Help Guide |
| Volume Settings | Sets the volume for movie playback. | Help Guide |
| Delete confirm. | Sets whether [Delete] or [Cancel] is preselected in the delete confirmation screen. | Help Guide |
| Power Save Start Time | Sets the time intervals to automatically switch to power save mode. | Help Guide |
| Auto Power OFF Temp. | Sets the camera temperature at which the camera turns off automatically during shooting. When shooting in hand-held mode, set to [Standard]. | Help Guide |
| NTSC/PAL Selector*1 | Changes the TV format of the device so that you can shoot in a different movie format. | Help Guide |
| Cleaning Mode | Starts the cleaning mode to clean the image sensor. | Help Guide |
| Touch Operation | Sets whether or not to activate the touch operation of the monitor. | 47 |
| Touch Panel/Pad | Selects whether to activate touch panel operation when shooting with the monitor, or touch pad operation when shooting with the viewfinder. | 47 |
| Touch Pad Settings | Adjusts settings related to touch pad operation. | Help Guide |
| Demo Mode | Sets demonstration playback of movies to on or off. | Help Guide |
| TC/UB Settings | Sets the time code (TC) and user bit (UB). * This function is for skilled movie creators. | Help Guide |
| IR Remote Ctrl | Sets whether to use the infrared remote control. | Help Guide |
| HDMI Settings | Sets the HDMI settings. Help | Guide |
| 4K Output Select | Sets how to record and output 4K movies via HDMI when the camera is connected to an external recorder/ player that supports 4K. | Help Guide |
| USB Connection | Sets the USB connection method. Help | Guide |
| USB LUN Setting | Enhances compatibility by limiting the functions of USB connection. Set to [Multi] in normal conditions and to [Single] only when the connection cannot be established. | Help Guide |
| USB Power Supply | Sets whether to supply power via USB connection when the camera is connected to a computer or USB device. | Help Guide |
| Language | Selects the language. 30 | |
| Date/Time Setup | Sets the date, time, and daylight savings. | 30 |
| Area Setting | Sets the location of use. Help | Guide |
| IPTC Information | Writes IPTC information when recording still images. | Help Guide |
| Copyright Info | Sets copyright information for still images. | Help Guide |
| Write Serial Number | Writes the camera's serial number to the Exif data when recording still images. | Help Guide |
| Format | Formats the memory card. Help | Guide |
| Rec. Media Settings | Sets the method for recording images to two memory card slots. | Help Guide |
| File/Folder Settings | Sets file names for still images to be shot, and specifies folders for storing the shot still images. | Help Guide |
| File Settings | Sets file numbers and file names for movies to be recorded. | Help Guide |
| Recover Image DB | Recovers the image database file and enables recording and playback. | Help Guide |
| Display Media Info. | Displays the remaining recording time of movies and the recordable number of still images on the memory card. | Help Guide |
| Version | Displays the camera software version. | Help Guide |
| Save/Load Settings | Saves the camera settings to a memory card, or reads saved settings from the memory card. | Help Guide |
| Setting Reset | Restores settings to their defaults. Select [Initialize] to restore all settings to their default values. | Help Guide |
GB
| Add Item | Adds desired MENU items to ★ (My Menu). | Help Guide |
| Sort Item | Sorts the MENU items added to ★ (My Menu). | Help Guide |
| Delete Item | Deletes MENU items added to ★ (My Menu). | Help Guide |
| Delete Page | Deletes all the MENU items on a page in ★ (My Menu). | Help Guide |
| Delete All | Deletes all the MENU items added to ★ (My Menu). | Help Guide |
| Display From My Menu | Sets whether or not to display the My Menu first when the MENU button is pressed. | Help Guide |
*1 If you change this item, you will need to format the memory card for compatibility with the PAL or NTSC system. Also, note that it may not be possible to play back movies recorded for the NTSC system on PAL system TVs.
List of icons on the monitor
The displayed contents and their positions in the illustrations are just guidelines, and may differ from the actual displays.
Icons on the shooting screen
Monitor mode Viewfinder mode
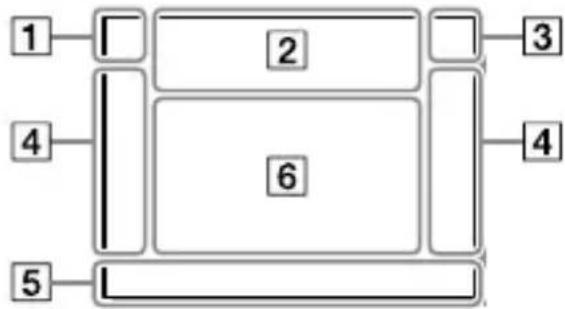
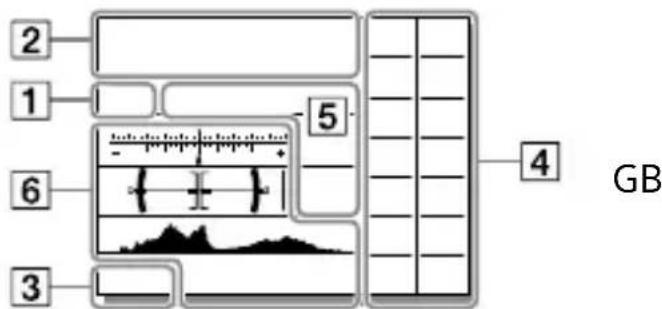
1 Shooting mode/ Scene recognition
Shooting mode (31)

Register number (65)

Scene Recognition icons
2 Camera settings

Memory card status (25, 88)
100/1h30m
Remaining number of recordable images (89) / Recordable time of movies (90)
1113
Writing data / Number of images left to write
3:2 4:3 16:9 1:1
Aspect ratio of still images (64)
24M 21M 20M 16M 10M 9.2M
8.7M 6.9M 6.0M 5.3M 5.1M
4.0M 2.6M 2.3M 2.2M 1.7M
Image size of still images (52)
RAW RAW
RAW recording (compressed/
uncompressed) (51)
X.FINE FINE STD
JPEG Quality (51)
XAVCS4K XAVCSHD AVCHD
File format of movies (54)
100
60
50
25
16
FX
FH
Record setting of movies (55)
120p
50p 6
0i 3
0p 24p
100p
50p 5
0i 25p
Frame rate of movies (55)
100Px
60Px
50Px
25 P
16Px
Proxy Recording (70)
120fps 60fps 30fps 15fps 8fps 4fps
100fps 50fps 25fps 12fps 6fps
3fps 2fps 1fps
Frame rate for slow/quick
motion shooting (70)
APS-C/Super 35mm (53,
64)
40
Flash charge in progress
VIEW
Setting Effect OFF (72)
ON
AF Illuminator (66)
Flicker
Flickering detected (69)
FF


SteadyShot off/on, Camera
shake warning (71)
8mm


SteadyS. Focal Len./ Camera
shake warning (71)
s@


Smart Zoom /
Clear Image Zoom / Digital
Zoom (71)
-PC-
PC remote (74)
图
Bright Monitoring
Shooting without shutter sound
(42)
Remote control (78)
OFF
No audio recording of movies
(70)
Wind Noise Reduct. (71)

Copyright information writing on (78)
IPTC
IPTC information writing on (78)

Focus Cancel (48)

Tracking Cancel (49)
Spot Focus
Performing [Spot Focus] (49)

NFC active (58)

Bluetooth connection available / Bluetooth connection unavailable (75)


Connected to smartphone / Not connected to smartphone


Obtaining location information/ Location information cannot be obtained (75)

Airplane Mode (74)

Overheating warning

Database file full/Database file error
3 Battery

Remaining battery (23)

Remaining battery warning

USB power supply (78)
4 Shooting settings
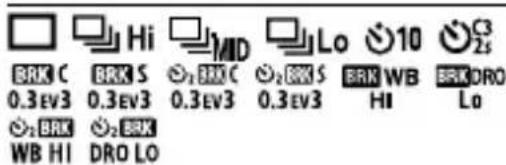
Drive Mode (45)

Flash Mode (68) /
Wireless Flash (68) /
Red Eye Reduction (68)
0.0
Flash Comp. (68)

Focus Mode (33)


Focus Area (35)
JPEGRAWRAW+J+JRAW
File Format (51)
Metering Mode (67)
AWB AWB AWB
票-1票0票+1票+2WB
7500K A5 G5
White Balance (Auto, Preset, Underwater Auto, Custom, Color temperature, Color filter) (68)
D-R DRO HOR OH OFF AUTO AUTO
D-Range Optimizer/Auto HDR (68)
Std. Vivid Ntr Clear Deep Light Port
Land Sures Night Aulm B/W Sepia
+3+3+3
Creative Style (69)/Contrast, saturation, and sharpness
Toy Pop Pos Rnre
T
Picture Effect (69)
[ON]AF [OF
Face/Eye Priority in AF (66)
目目目AUTO MECH ELEC
Shutter Type (40)
1 2
Prioritize Rec. Media (79)
5 Focus indicator/exposure settings
Focus indicator (34)
1/250
Shutter speed
F3.5
Aperture value
图
Exposure compensation (67)/ Metered Manual
ISO400 ISO AUTO ISO400
ISO sensitivity (67)
AWB
AE lock/FEL lock/AWB lock
6 Guides/other
Tracking Cancel
Guide display for tracking (49)
Focus Cancel
Guide display for canceling focusing (48)
ISO
Control wheel function
AvTvISO
Guide display for My Dial
+
Bracket indicator

Spot metering area (67)
Exposure Setting Guide (72)

Shutter speed indicator

Aperture indicator

Histogram
Digital level gauge
STBYREC
Movie recording standby/Movie recording in progress
1:00:12
Actual movie recording time (hours: minutes: seconds)

Audio Level Display (71)

C Control (78)
00:00:00:00
Time code (hours: minutes: seconds: frames) (78)
00 00 00 00
User Bit (78)
Icons on the playback screen
Single-image playback Histogram display
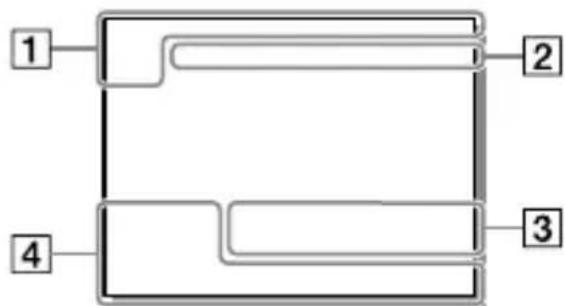
1 Basic information

Playback media (76)

ew Mode (76)


IPTC
IPTC Information (78)

Rating (75)

Protect (75)
DPOF
DPOF set (76)
3/7
File number/Number of images in the view mode

NFC active (58)

Remaining battery (23)

Display as Group (76)

Proxy movie included (70)

A voice memo is attached (76)
2 Camera settings
Refer to "Icons on the shooting screen" (page 81).
3 Shooting settings

Picture Effect error

Auto HDR error (68)
35mm
Lens focal length
Refer to "Icons on the shooting screen" (page 81) for other icons displayed in this area.
4 Image information

Latitude/longitude information (59)

Copyright information included
2019-1-1 10:37PM
Date of recording (30)
100-0003
Folder number - File number (79)
C0003
Movie file number (79)

Histogram (Luminance/R/G/B)
Specifications
Battery life and number of recordable images
| Battery life Number of images | ||
| Shooting(still images) | Screen mode | — Approx. 690 |
| Viewfinder mode | — Approx. 500 | |
| Actual shooting(movies) | Screen mode | Approx. 120 min. — |
| Viewfinder mode | Approx. 110 min. — | |
| Continuous shooting(movies) | Screen mode | Approx. 200 min. — |
| Viewfinder mode | Approx. 195 min. — | |
GB
- The above estimates for battery life and number of recordable images apply when the battery pack has been fully charged. The battery life and number of images may decrease depending on the conditions of use.
-
The battery life and number of recordable images are estimates based on shooting with the default settings under the following conditions:
-
Using the battery pack at an ambient temperature of 25^ (77^) .
- Using a Sony SDXC memory card (U3) (sold separately)
-
Using a FE 28-70 mm F3.5-5.6 OSS lens (sold separately)
-
The numbers for "Shooting (still images)" are based on the CIPA standard and shooting under the following conditions:
(CIPA: Camera & Imaging Products Association)
- One picture is taken every 30 seconds.
-
The power is turned on and off once every ten times.
-
The number of minutes for movie shooting is based on the CIPA standard and shooting under the following conditions:
-
The image quality is set to XAVC S HD 60p 50M / 50p 50M.
- Actual shooting (movies): Battery life based on repeated shooting, zooming, shooting stand-by, turning on/off, etc.
- Continuous shooting (movies): No operations other than starting and ending shooting are performed.
Memory cards that can be used
This camera only supports SD memory cards (UHS-II compatible).
When using microSD memory cards with this camera, be sure to use the
appropriate adaptor.
| Recording format Supported memory card | |
| Still image | SD/SDHC/SDXC card |
| AVCHD | SD/SDHC/SDXC card (Class 4 or faster, or U1 or faster) |
| XAVCS | 4K 60 Mbps* HD 50 Mbps or lower* HD 60 Mbps |
| SDHC/SDXC card (Class 10, or U1 or faster) | |
| 4K 100 Mbps* HD 100 Mbps | |
| SDHC/SDXC card (U3) | |
- Including when recording proxy movies at the same time
Note
- When an SDHC memory card is used to record an XAVC S movie over extended periods of time, the recorded movies will be divided into files 4 GB in size. The divided files can be handled as a single file by importing them to a computer using PlayMemories Home.
- When recording a movie on memory cards in both the slot 1 and the slot 2 with following camera settings, insert two memory cards with the same file system. XAVC S movies cannot be recorded simultaneously when using a combination of the exFAT file system and FAT32 file system.
File Format] is set to [XAVC S 4K] or [XAVC S HD]
- [Recording Mode] under [Rec. Media Settings] is set to [Simultaneous] or
[Simult.(/)]
| Memory card File system | |
| SDXC memory card | exFAT |
| SDHC memory card | FAT32 |
- Charge the battery pack sufficiently before attempting to recover the database files on the memory card.
Number of recordable images
When you insert a memory card into the camera and turn the camera on, the number of images that can be recorded (should you continue to shoot using the current settings) is displayed on the screen.
Note
- When "0" (the number of recordable images) flashes in orange, the memory card is full. Replace the memory card with another one, or delete images from the current memory card.
- When "NO CARD" flashes in orange, it means no memory card has been inserted. Insert a memory card.
The number of images that can be recorded on a memory card
The table below shows the approximate number of images that can be recorded on a memory card formatted with this camera. The values are defined using Sony standard memory cards for testing.
The values may vary depending on the shooting conditions and the type of memory card used.
[JPEG Image Size]: [L: 24M]
(Units: Images)
| JPEG Quality/ Format | 8 GB 32 GB 64 GB 256 GB | |||
| Standard | 1100 45 | 50 9000 36 | 000 | |
| Fine | 780 315 | 0 6300 25000 | ||
| Extra fine | 430 170 | 0 3500 14000 | ||
| RAW & JPEG (Compressed RAW)*2 | 210 860 | 1700 6900 | ||
| RAW (Compressed RAW) | 295 120 | 0 2400 9600 | ||
| RAW & JPEG (Uncompressed RAW)*2 | 125 | 510 1000 | 4100 | |
| RAW (Uncompressed RAW) | 150 | 610 1200 | 4950 | |
1 When Aspect Ratio is set to other than [3:2], you can record more images than the numbers shown in the table (except when [RAW] is selected).
^2 [JPEG Quality] when [RAW & JPEG] is selected: [Fine]
Note
- Even if the number of recordable images is higher than 9999 images, "9999" will appear.
- The numbers shown are when using a Sony memory card.
Recordable movie times
The table below shows the approximate total recording times using a memory card formatted with this camera. The values may vary depending on the shooting conditions and the type of memory card used. The recording times for when [File Format] is set to [XAVC S 4K] and [XAVC S HD] are recording times when shooting with [Pxy Recording] set to [Off].
(h (hour), min (minute))
| File Format Record Setting 8 GB 32 GB 64 GB 256 GB | ||||
| XAVC S 4K 30p | 100M/25p 100M | 8 min 35 | min 1 h 15 m | in 5 h 5 min |
| 30p 60M/25p 60M | 10 min 55 | min 2 h 8 h | 5 min | |
| 24p 100M* 8 min 35 min 1 h 15 | min 5 h 5 min | |||
| 24p 60M* | 10 min 55 | min 2 h 8 h | 5 min | |
| XAVC S HD | 120p 100M/100p 100M | 8 min 35 | min 1 h 15 m | in 5 h 5 min |
| 120p 60M/100p 60M | 10 min 55 | min 2 h 8 h | 5 min | |
| 60p 50M/50p 50M | 15 min 1 h | 10 min 2 h | 25 min 10 h | |
| 60p 25M/50p 25M | 30 min 2 h | 20 min 4 h | 45 min 19 h | |
| 30p 50M/25p 50M | 15 min 1 h | 10 min 2 h | 25 min 10 h | |
| 30p 16M/25p 16M | 50 min | 3 h 35 min | 7 h 20 min | |
| 24p 50M* | 15 min | 1 h 10 min | 2 h 25 min | |
| AVCHD 60i 24M | (FX)/50i 24M (FX) | 40 min 2 | h 55 min 6 h | 24 h 15 min |
| 60i 17M (FH)/50i 17M (FH) | 55 min | 4 h 5 min | 8 h 15 min | |
-
Only when [NTSC/PAL Selector] is set to NTSC
-
The duration of time available for movie recording varies depending on the file format/recording settings for movies, memory card, ambient temperature, Wi-Fi network environment, condition of the camera before you start recording, and condition of the charging of the battery. The maximum continuous recording time for a single movie shooting session is approximately 13 hours (a product specification limit).
Note
- The recordable time of movies varies because the camera is equipped with VBR (Variable Bit-Rate), which automatically adjusts image quality depending on the shooting scene. When you record a fast-moving subject, the image is clearer but the recordable time is shorter because more memory is required for recording. The recordable time also varies depending on the shooting conditions, the subject or the image quality/size settings.
- The times shown are recordable times using a Sony memory card.
GB
Notes on continuous movie recording
- High-quality movie recording and high-speed continuous shooting require large amounts of power. Therefore, if you continue to shoot, the temperature inside the camera will rise, especially that of the image sensor. In such cases, the camera will turn off automatically because the surface of the camera is heated to a high temperature or the high temperature affects the quality of the images or the internal mechanism of the camera.
- The duration of time available for continuous movie recording when the camera records with the default settings after the power has been turned off for a while is as follows. The values indicate the continuous time from when the camera starts recording until the camera stops recording.
| Ambient temperature | Continuous recording time for movies (HD) | Continuous recording time for movies (4K) |
| 20°C (68°F) | Approx. 60 min. Approx. | 60 min. |
| 30°C (86°F) | Approx. 60 min. Approx. | 60 min. |
| 40°C (104°F) | Approx. 60 min. Approx. | 30 min. |
HD: XAVC S HD (60p 50M/50p 50M, when the camera is not connected via Wi-Fi)
4K: XAVC S 4K (24p 60M/25p 60M, when the camera is not connected via Wi-Fi)
-
The duration of time available for movie recording varies with the temperature, file format/record setting for movies, Wi-Fi network environment, or condition of the camera before you start recording. If you frequently recompose or shoot images after the power is turned on, the temperature inside the camera will rise and the recording time available will be shorter.
-
If the icon appears, the temperature of the camera has risen.
-
If the camera stops movie recording due to a high temperature, leave it for some time with the power turned off. Start recording after the temperature inside the camera drops fully.
-
If you observe the following points, you will be able to record movies for longer periods of time.
-
Keep the camera out of direct sunlight.
-
Turn the camera off when it is not being used.
-
When [File Format] is set to [AVCHD], the file size of movies is limited to approx. 2 GB. If the movie file size reaches approx. 2 GB during recording, a new movie file will be created automatically.
Specifications
Camera
[System]
Camera Type: Interchangeable Lens Digital Camera Lens: Sony E-mount lens
[Image sensor]
Image format: 35mm full frame (35.6mm× 23.8mm) , CMOS image sensor
Effective pixel number of camera: Approx. 24 200 000 pixels
Total pixel number of camera: Approx. 28300000 pixels
[SteadyShot]
In-camera sensor shift image stabilization system
[Auto focus system]
Detection system: Phase detection system/Contrast detection system Sensitivity Range: -3EV to +20EV (at
ISO 100 equivalent, F2.0)
[Electronic viewfinder]
Type: 1.3 cm (0.5 type) Electronic Viewfinder
Total number of dots: 3686400 dots
Magnification: Approx. 0.78 × with 50 mm lens at infinity, -1 ~m^1
Eye Point: Approx. 23 mm from the eyepiece and approx. 18.5 mm from the eyepiece frame at -1m^1
Diopter Adjustment: -4.0m^-1 to +3.0m^-1
[Monitor]
7.5 cm (3.0 type) TFT drive, touch panel
Total number of dots: 1440000 dots
[Exposure control]
Metering method: 1200-zone evaluative metering
Metering Range: -3 EV to +20 EV (at ISO 100 equivalent with F2.0 lens)
ISO sensitivity (Recommended exposure index):
Still images: ISO 100 to ISO 51 200
(Extended ISO: Minimum ISO 50, maximum ISO 204 800)
Movies: ISO 100 to ISO 51 200
equivalent (Extended ISO:
Minimum ISO 100, maximum ISO
102400)
[Shutter]
Type: Electronically-controlled, vertical-traverse, focal-plane type
Speed range:
Still images (when shooting with the electronic shutter):
1/32 000 second* to 30 seconds (up to 1/8 second in continuous shooting)
- Available only in the M (Manual Exposure) and S (Shutter Priority) modes. For details, refer to the "Help Guide."
Still images (when shooting with the mechanical shutter):
1/8 000 second to 30 seconds, BULB
Movies: 1/8 000 second to 1/4 second
1080 60i-compatible devices (1080 50i-compatible devices): up to 1/60 (1/50) second in AUTO mode (up to 1/30 (1/25) second in Auto slow shutter mode)
Flash sync speed: 1/250 second (when using a flash manufactured by Sony)
[Recording format]
File format: JPEG (DCF Ver. 2.0, Exif Ver. 2.31, MPF Baseline) compliant, RAW (Sony ARW 2.3 format)
Movie (XAVC S format): MPEG-4 AVC/H.264 XAVC S ver.1.0 format compliant Video: MPEG-4 AVC/H.264 Audio:LPCM 2ch (48 kHz 16 bit)
Movie (AVCHD format): AVCHD format Ver. 2.0 compatible Video: MPEG-4 AVC/H.264 Audio: Dolby Digital 2ch, equipped with Dolby Digital Stereo Creator
Manufactured under license from Dolby Laboratories.
[Recording media]
SLOT 1/SLOT 2: Slot for SD cards (UHS-I and UHS-II compatible)
[Input/output terminals]
USB Type-C terminal: SuperSpeed USB (USB 3.2 Gen 1)
Multi/Micro USB Terminal*: Hi-Speed USB (USB 2.0)
- Supports Micro USB compatible devices.
HDMI: HDMI type D micro jack
(Microphone) terminal: 03.5 mm Stereo mini jack
(Headphones) terminal: 0.5 mm Stereo mini jack
LAN terminal
4 (Flash sync) terminal
[General]
Rated input: 7.2V 39 W
Operating temperature: 0 to 40^ (32 to 104^ )
Storage temperature: -20 to 55^ (-4 to 131^
Dimensions (W/H/D) (Approx.):
128.9 × 96.4 × 77.5 mm
128.9 × 96.4 × 67.3 mm
(from grip to monitor)
5 1/8 × 3 7/8 × 3 1/8 in.
5 1/8 × 3 7/8 × 2 3/4 in.
(from grip to monitor)
Mass (Approx.): 678 g (1 lb 8 oz) (including battery pack, SD card)
[Wireless LAN]
WW942051 (see name plate on the bottom of camera)
Supported format: IEEE 802.11 a/b/g/n/ac
Frequency band: 2.4 GHz/5 GHz
Security: WEP/WPA-PSK/WPA2-PSK
Connection method: Wi-Fi Protected SetupTM (WPS)/ Manual
Access method: Infrastructure mode
WW485782 (see name plate on the bottom of camera)
Supported format: IEEE 802.11 b/g/n
Frequency band: 2.4 GHz
Security: WEP/WPA-PSK/WPA2-PSK
Connection method: Wi-Fi Protected SetupTM (WPS)/ Manual
Access method: Infrastructure mode
[NFC]
Tag type: NFC Forum Type 3 Tag compliant
[Bluetooth communications]
Bluetooth standard Ver. 4.1
Frequency band: 2.4 GHz
Battery charger BC-QZ1
Rated input:
100 - 240 V, 50/60 Hz, 0.38 A
Rated output: 8.4V = 1.6A
Rechargeable battery pack NP-FZ100
Rated voltage: 7.2V
Design and specifications are subject to change without notice.
On image data compatibility
- This camera conforms with DCF (Design rule for Camera File system) universal standard established by JEITA (Japan Electronics and Information Technology Industries Association).
- Playback of images recorded with your camera on other equipment and playback of images recorded or edited with other equipment on your camera are not guaranteed.
Trademarks
XAVCS an XARC registered trademarks of Sony Corporation.
- "AVCHD" and the "AVCHD" logotype are trademarks of Panasonic Corporation and Sony Corporation.
- Mac is a trademark of Apple Inc., registered in the United States and other countries.
- iPhone and iPad are trademarks of Apple Inc., registered in the U.S. and other countries.
- Blu-ray Disc^TM and Blu - ray^TM are trademarks of the Blu-ray Disc Association.
-
DLNA and DLNA CERTIFIED are trademarks of Digital Living Network Alliance.
-
USB Type- C^TM and USB- C^TM are trademarks of USB Implementers Forum.
-
Dolby, Dolby Audio and double-D symbol are trademarks of Dolby Laboratories.
- The terms HDMI, HDMI High-Definition Multimedia Interface, and the HDMI Logo are trademarks or registered trademarks of HDMI Licensing Administrator, Inc.
- Microsoft and Windows are registered trademarks or trademarks of Microsoft Corporation in the United States and/or other countries.
- SDXC logo is a trademark of SD-3C, LLC.
-
Android and Google Play are trademarks or registered trademarks of Google LLC.
-
Wi-Fi, the Wi-Fi logo and Wi-Fi Protected Setup are registered trademarks or trademarks of the Wi-Fi Alliance.
The N-Mark is a trademark or registered trademark of NFC Forum, Inc. in the United States and in other countries.
-
The Bluetooth® word mark and logos are registered trademarks owned by the Bluetooth SIG, Inc. and any use of such marks by Sony Corporation is under license.
-
QR Code is a trademark of Denso Wave Inc.
-
In addition, system and product names used in this manual are, in general, trademarks or registered trademarks of their respective developers or manufacturers. However, the ^TM or ^ marks may not be used in all cases in this manual.


On GNU GPL/LGPL applied software
The software that is eligible for the following GNU General Public License (hereinafter referred to as "GPL") or GNU Lesser General Public License (hereinafter referred to as "LGPL") are included in the product.
This informs you that you have a right to have access to, modify, and redistribute source code for these software programs under the conditions of the supplied GPL/LGPL. Source code is provided on the web. Use the following URL to download it. http://oss.sony.net/Products/Linux/ We would prefer you do not contact us about the contents of source code.
Licenses (in English) are recorded in the internal memory of your product. Establish a Mass Storage connection between the product and a computer to read licenses in the "PMHOME" - "LICENSE" folder.
Additional information on this product and answers to frequently asked questions can be found at our Customer Support Website.
https://www.sony.net/
GB
https://rd1.sony.net/help/ilc/1960/h_zz/
charge le Memory Stick.
Fente 1 Fente 2
https://support.d-imaging.sony.co.jp/app/remotecameratool/l/index.php
8.7M 6.9M 6.0M 5.3M 5.1M
4.0M 2.6M 2.3M 2.2M 1.7M
120p 60p 60i 30p 24p
100p 50p 50i 25p
120fps 60fps 30fps 15fps 8fps 4fps
100fps 50fps 25fps 12fps 6fps 3fps 2fps 1fps
AWB AWB AWB 桑 点 猿-1猿0猿+1猿+2WB
7500K A5 G5
FEL/Verrouillage AWB

Guides/autres
Annulation du suivi
(CIPA: Camera & Imaging Products Association)
(DCF Ver. 2.0, Exif Ver. 2.31, MPF
Baseline), RAW (format Sony ARW 2.3)
Film (format XAVC S) :
Film (format AVCHD) :
SuperSpeed USB (USB 3.2 Gen 1)
Wi-Fi Protected SetupTM (WPS)/
manuelle
Méthode d'accès :
Mode Infrastructure
Wi-Fi Protected SetupTM (WPS)/
manuelle
Méthode d'accès :
Mode Infrastructure
[NFC]
[Communications Bluetooth]
Norme Bluetooth Ver. 4.1
Batterie rechargeable NP-FZ100
S&Q P S&Q A S&Q S&Q S&Q M
Aufnahmemodus (31)
123 M 1 M 2 M 3 M 4
Registernummer (67)

8.7M 6.9M 6.0M 5.3M 5.1M
4.0M 2.6M 2.3M 2.2M 1.7M
120p 60p 60i 30p 24p
100p 50p 50i 25p
120fps 60fps 30fps 15fps 8fps 4fps
100fps 50fps 25fps 12fps 6fps
3fps 2fps 1fps
(CIPA: Camera & Imaging Products Association)
https://rd1.sony.net/help/ilc/1960/h_zz/
https://support.d-imaging.sony.co.jp/app/remotecamera tool/index.php
24M 21M 20M 16M 10M 9.2M
8.7M 6.9M 6.0M 5.3M 5.1M
4.0M 2.6M 2.3M 2.2M 1.7M
120p 60p 60i 30p 24p 100p 50p 50i 25p
120fps 60fps 30fps 15fps 8fps 4fps 100fps 50fps 25fps 12fps 6fps 3fps 2fps 1fps
https://rd1.sony.net/help/ilc/1960/h_zz/
ILCE-9M2 Guida

https://rd1.sony.net/help/di/ftp/h_zz/
IT

https://support.d-imaging.sony.co.jp/app/remotecameratool/l/index.php
8.7M 6.9M 6.0M 5.3M 5.1M
4.0M 2.6M 2.3M 2.2M 1.7M
120p 60p 60i 30p 24p
100p 50p 50i 25p
120fps 60fps 30fps 15fps 8fps 4fps
100fps 50fps 25fps 12fps 6fps
3fps 2fps 1fps
AWB AWB AWB 燥-1 燥0 燥+1 燥+2 WB
7500K A5 G5
SuperSpeed USB (USB 3.2 Gen 1)
Terminale USB multiplo/Micro*:
Hi-Speed USB (USB 2.0)
Wi-Fi Protected SetupTM (WPS) /
manuale
https://rd1.sony.net/help/di/ftp/h_zz/

PT
https://support.d-imaging.sony.co.jp/app/remotecameratool/l/index.php
PT
Utilizar itens do MENU
S&O P S&Q A S&Q S&Q S&Q M
8.7M 6.9M 6.0M 5.3M 5.1M
4.0M 2.6M 2.3M 2.2M 1.7M
120p 60p 60i 30p 24p
100p 50p 50i 25p
120fps 60fps 30fps 15fps 8fps 4fps
100fps 50fps 25fps 12fps 6fps 3fps 2fps 1fps
Executor [Foco Ponto]

NFC ativo (28)

Otimiz Alc Din/HDR Auto

$$ + 3 + 3 + 3 $$
SuperSpeed USB (USB 3.2 Gen 1)
Multi Terminal/Terminal Micro USB*: Hi-Speed USB (USB 2.0)
Wi-Fi Protected SetupTM (WPS)/
Manual
Helpfunct. in camera

https://rd1.sony.net/help/di/ftp/h_zz/

- Basiskennis van FTP-servers is vereist.
https://support.d-imaging.sony.co.jp/app/remotecamera tool/l/index.php
8.7M 6.9M 6.0M 5.3M 5.1M
4.0M 2.6M 2.3M 2.2M 1.7M
120p 60p 60i 30p 24p
100p 50p 50i 25p
120fps 60fps 30fps 15fps 8fps 4fps
100fps 50fps 25fps 12fps 6fps
3fps 2fps 1fps
AWB AWB AWB 燥-1票0票+1票+2WB
7500K A5 G5
[Bluetooth-communicatie]
Bluetooth-norm Ver. 4.1
https://rd1.sony.net/help/di/ftp/h_zz/
![SONY Alpha A9 II - [Bluetooth-communicatie] - 1](/content/2026/03/483534/images/3223f8e8fdf31062b46c15f84dc138061678aa30d97fd3f9e809eadc6506beb3.jpg)
PL
https://support.d-imaging.sony.co.jp/app/remotecameratool/l/index.php
8.7M 6.9M 6.0M 5.3M 5.1M
4.0M 2.6M 2.3M 2.2M 1.7M
120p 60p 60i 30p 24p
100p 50p 50i 25p
120fps 60fps 30fps 15fps 8fps 4fps
100fps 50fps 25fps 12fps 6fps 3fps 2fps 1fps
m = 311
![SONY Alpha A9 II - [Bluetooth-communicatie] - 2](/content/2026/03/483534/images/93d9edd3ebdb47e260fe95fdecd1a63613e2d35c95a111b7ac617d66daaed041.jpg)
0.3EV3
![SONY Alpha A9 II - [Bluetooth-communicatie] - 3](/content/2026/03/483534/images/55a29e5c5384cdeec079a6a41aac1630d46c0e6430484ce30f77b3d800e56dc4.jpg)
ERKBWB HI
![SONY Alpha A9 II - [Bluetooth-communicatie] - 4](/content/2026/03/483534/images/161c5200690c1947114ddd3a23240476ac922622cd5745f3457ad6ea45e413e0.jpg)
3DRO L0
PL
![SONY Alpha A9 II - [Bluetooth-communicatie] - 5](/content/2026/03/483534/images/df77e40c520fd0c86b8dc0a0c9d9f56ca4ee2d25e5bd5516c7b2ce27c7831eec.jpg)
Film (format AVCHD):
SuperSpeed USB (USB 3.2 Gen 1)
Zlácze USB Multi/Micro*:
Hi-Speed USB (USB 2.0)
Wi-Fi Protected SetupTM (WPS)/
reczna
BbIOpJHHeHne [ΦOpMaTnpOBA Tb] nIi [YdaIITb] Ha KaMepe nIi KOMNbIOTepe MoKeT He ydaIITb NOJIHOCTbIO DaHHbIe C KaPTbI NaMAYtN. Ppi nepeJaue KePTbI NaMAYtN dpyrIM IInzam peKOMeHNdyETcY daJIaTb DaHHbIe NOLHOCTbIO C NOMOuBIO npOrpaMMHoro oBeCneueHn YdaJIeHn DaHHbIX. Ppi yTuIN3aunn KapTbI NaMAYtN peKOMeHNdyETcR pa3pyuNTb ee fN3UYeCKN.
PpmeaHne OTHoCnTeJbHo ceTebix yHKcni
Pn nCnoJb3OBaHn CeTeBbIX yHKnB 3aBNCMOCn OT ycIOBn nCNOJb3OBaHn TpeTbN CTOpOHb B CETn MOrT NOJyHTb HnpeDHaMepeHHbI DOCTyn K KaMepe.
Ha npimep, HecaHKuHnOHOBaHHbI DoCTyn K KaMepe MoKet NMeTb MeCTo B cETn, K KOToPOi NOkJIooHeNo NNMOxKet 6bITb NODKlIOueHo 6e3 pa3peSeHnA dpyroe cTeBOe UcTPOJCTBO. Sony He Hecet OTBETCTBeHNOCTn 3a JIO6bIe NOTepn NNIOBpeXdEHNr, Bbl3BaHHbIe NODKJIIOUeHnEM K TaKIM CeTAM.
IprimeaHne no nooce yactOT 5Tt dJa 6ecnpobHOJ loKaJIbHOcTeN
IpnncnoJb3OBAHnN FyHKcnn 6ecnpoBODHOJ NOKaJIbHOJ CETN BHe NOMeUeHnYCTaHOBNTe NOLOCy UactOT 2,4 TtC B COOTBeTCTBnC npNBedeHNO HIXe PPOeDpyoN. (ToIbKO WW942051)
- MENU - (CeTb) → [Hactpoyn Wi-Fi]
Kak BpeMeHNO OTKJIIOHTb YHKcIMN 6ecnpoBOHOcTn (Wi-Fi, n T.I.)
HaxoJcB Ha 6OpTy caMoJeTa n T.I., MOxHO BpeMeHHO OTKJIHouNTb BCE yHKuN 6ecnpoBOdHOcTeN c NOMOuBIO [Pekm noIeTa].
BHIMAHNE
B ueJx 6e3oNacHocTn He
IODcoEINHnTe pa3bem IJIa
IODKIIuOHeHnpePiΦepnHbIX
yCTPOJCTB, B KOTOPOM MOKeT
6bITb Upe3MepHoe IJIpa3beMa
JOKaJIbHOJ cETn HAnpJXeHne.
CneDyIe HNCTpyKUm IJIpa3bema JOKaJIbHOcTn.
Ceteboi shyp
PykoBODCTBO NO haayy pa60tbl
2 BCTaBbTe aKKymyIaTOp, Haxmampa6loKnpOBKn KOHcOM aKKymyIaTopa Do Tex nOp, poka aKKymyIaTOp He 3aueJkHeTcHa MeCTe.
3 3aKpoTe KpbIshKy.

Для зараздки akКуМлЯТopa, KOTOpbI BCTaBJIeH B KaMepy
BbIKIIOHTe KaMepu n IODcoEINHnTe ee K yCTpOYCTBY, TaKOMy KaK KOMNbIOTep, c NOMOUsIO Ka6eJr USB.
Y6eIITecbBTOM,HTO INHINKaTOp
IOCTyna (cTp.10) He ropnt, IN
BbIKJIOHTe KaMepy.3aTeM cDVBnBte
pbUar 6JIOKNPOBKn N I3BNeKNTe
aKKymJrTOp.BydTe OCTOPOXHbl,
HTo6bl He ypoHNb aKKymJrTOp.
1 OtkpoTe KpbIshky OtceKa KapTbI NaMrtn.
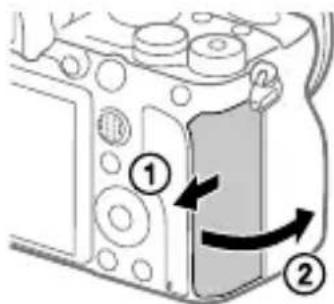
2 BcTaBbTe KapTy SD B cnot 1.
- KaK cnot 1 (BepxHn), TaK n cnot 2 (HnxHn) NOdEePKBaOT TOJIbKO KapTbI NaMaTn SD (COBMeCTmMbie c UHS-II).
- Данная камера He подерхивает Memory Stick.
BCTaBJIte KapTu nAmrTu, pacNoJoxNb ee CTOPOHOc KOHTaKTamK Ce6e, Noka OHa He 3aUeJIKNHeTcRa Ha MeCTe. - Bbl MOxTe N3MeHЯTb Cnot KapTb I NaMraTn DJIa NcNoJb3OBAHna NyTeM Bbl6opa MENU (HacToPka) [HacTp. 3aInc. Hocnt.] [Ipnop. Hocnt. 3an.]
Cnot 1 nCnoJb3yeTcB yCTaHOBkax no yMOJuaHnIO.
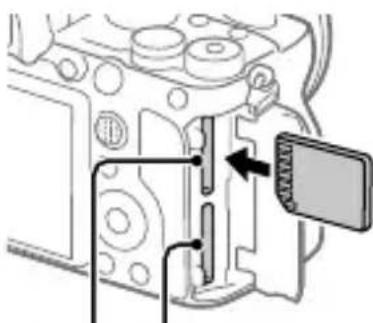
Cnot1 Cnot2
RU
3 3aKpoIe KpbIshKy.
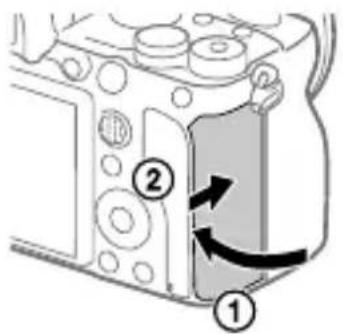
Cobet
7 NOBTOpe IeICTBna PnyKTOB 5 n 6 dJa yCTaHOBKn dpyrnx PnyKTOB, a 3aTeM BbI6epITE [BBoD] n HaxMMte no ceHTpy.
Cobet
2 CMOTPNTe B VbdoNcKaTeJIb IJI MOnHTOp N yIepXnBaIte KaMepy.
3 YctaHOBNTe pa3Mep obBeKTa nyTem NOBOPOta KOJIbca 3yMMnPOBaHna o6BeKTnBa, ecIn KOJIbIcO 3yMMnPOBaHna npIKpeNJIeHo.
4 HaKmTe KhoNky 3aTBopa HanoJIOBHy dJa BbIOpJIHeHnA _OKCnPOBKn
- Ecnn n3o6paXeHne nonaTeB OKyc, BbICBETNTcNnDnKatOp (HaNPmep, ●).
5 Haxmte KhoNky 3aTBopa Bn3 do ynopa.
Для сбемки Виdeo
Haxmnte Khonky MOVIE nla hauana/octaHOBKn 3aNNcN.
Для ВоспponЗвedeня CHIMKOB
HaxmTe KhoNky BocnpOn3BeDeHne)IJI BOCpOn3BeDcHnA CHIMKOB. Bb MoXeTe Bb6paTb HxHbI CHMOK C NOMOuHO KOJecnKa ynpaBHeHnA.
https://support.d-imaging.sony.co.jp/app/remotecameratool/l/index.php
Pexim MoHToPa Pexim BnOncKaTeIa
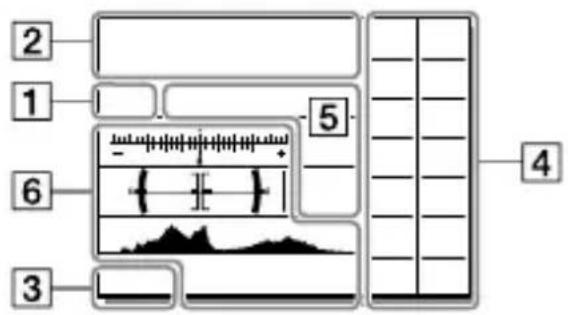
1 PeKIM cBeMKN/ Pacno3HaBaHne cUeH
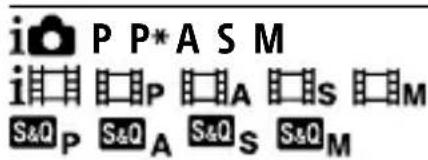
PexnM cbeMkn (27)

HomepeTpa

3Hauchn paCno3HaBaHnra CueHbI
2 YctaHOBKn KaMepbl

CocToHHe KapTbI namrTn (21, 40)
100/1h30m
OCTaBWeecsKaKoJnuecTBo DOCTyHbIXДЯ3aPnCn CHIMKOB/IOCTyHnHoeBpeM BnIeO3aPnCn
1113
8.7M 6.9M 6.0M 5.3M 5.1M
4.0M 2.6M 2.3M 2.2M 1.7M
Pa3mep n3o6paXeHnA
ΦOTOCHMKB
RAW RAW
3a nscb B φopmaTe RAW
(CkataHHeCkataH)
X.FINE FINE STD
KaueCTBO JPEG
XAVCS4K XAVCSHD AVCHD
ΦopMaT BuIeOaIIOB
100
60
50
25
16
FX
FH
YCTaHOBKn BnDeo3aNNCS
120p
60p 60i 30p 24p
100p 50p 50i 25p
YacToTa KaIpoB BnDeO
100
60
图
03 Pxx
25 Px
16
3aanncb npokcn
120fps 60fps 30fps 15fps 8fps 4fps
100fps 50fps 25fps 12fps 6fps
3fps 2fps 1fps
YacToTa KaIpoB IJIa
3aMeIeHHo/HyCKopeHHo
CbeMKN

APS-C/Super 35mm

BbINOHReTc3apKa BCnbluKn
VIEW
OTo6p.napam.BblKJI

POncBetka AF
Flicker
O6HapyKeHo MmraHne


SteadyShot BbIKI/BKJI,
IpeDynpexKdene O Bn6paun KaMepbl


Φok. pacct. SteadyS./
IpeDynpexKdene O Bn6paun KaMepbl


HTeJIeKtYaJbHbIy3ym/
YBeI. YeTk. n306. / LnΦpOBoN 3yM
-PC-
YdaJIeHHbI INK

KoHTpOJIb JApKoCTn

CbeMka 6e3 3Byka 3aTBopa

NylbT nCTaHcNOHHORO
ynpablenn

Bnneo3aanncb6e3 3Byka

YMeH. Wyma Betpa
RU

3aHnHΦopMaun o6 aBTOpCKNX npabax
IPTC
3aHcB IPTC-HHOpMaun

OTmeHa okyca

OTmeHa oTcJIeXnBaHnA
ToueyhbiΦokyc
BbIopJIHeHne [ToueuHbI OKyc]

NFCaKTHBHa (29)

Bluetooth-coeDInHeHneIOCTynHO/Bluetooth-coeDInHeHne HeOCTynHO


AWB AWB AWB 某-1 票+1 票+2
7500K A5 G5
Баланс белого (aBTOMaTnueckn, npeDyCTaHOBJIeHHbI, aBTOMaTnueckn NOd BOIOJ, NOJIb3OBaTeJIbCKN, ZBETOBaY TemnepaTypa, ZBETHOJФИьTp)

TbOpueck. cTnIb/KoHTpactHOCTb, HaCbIuEHHOCTb I pe3KoCTb

3ΦΦeK T pncyHka

Pnpop. nuc/rna3 AF

Tn3atbopa

Приор.НOCNT.3aI.
5 INdikatop fokycnpobkn/ yctaHOBKn 3Kcno3ninn

Hndkatop oKycnpOBKn
1/250
BbIepeKka
F3.5
3haeHne daaeparmbi

Koppekua 3Kcno3n / Puyho pexm n3mepeHna
ISO400 ISO AUTO ISO400
YyBCTBnTeJbHOCtB ISO

6 Yka3aTeJIn/npooyee
OTmeHa OTCJIeXINBaHnA
Yka3aTeJIb OTCJexKUBAHnA
OTmeHaΦokyca
Yka3aTeIbHaNnDnKaunI JIy OTMeHbI FOKycuPobKn

OT1/8000cekyHdbIdo30cekyH, BULB
Bnneo3aannc: ot 1/8 000 cekyHdbI do 1/4 cekyHdbI
1080 60i-COBMECTNMBIE
yctpoiCTBa
(1080 50i-coBmecTnMbie
yctpoiCTBa):
do 1/60 (1/50) cekyHdbI bpexIme
AUTO (do 1/30 (1/25) cekyHdbI
B aBTOMaTnueckom peXkIme
MeIeHHoro cpa6aTbIBaHn 3aTBopa)
CkopoocTB cnHxpoHn3aun
BCnbIuKn:1/250cekyHdbI (npN
NCIOJIb3OBAHIN BCnblUKN
npon3BODCTBa Sony)
[ΦopMaT3auncn]
ΦopMaT ΦaɪnOB: B COOTBeTCTBnN C JPEG (DCF Bep. 2.0, Exif Bep. 2.31, MPF Baseline), RAW (ΦopMaT Sony ARW 2.3)
Bndeo3ainncB (fOpMaT XAVC S): B COOTBeTCTBUN C fOpMaTOM MPEG-4AVC/H.264XAVCSBep.1.0
BnuJeo: MPEG-4 AVC/H.264
Aydno: LPCM 2 kaHana (48 KΓι 16 ΜιT)
Bndeo3anncb (fopMaT AVCHD): Pndepkka fOpMaTa AVCHD Bercn 2.0
BnuDeo: MPEG-4 AVC/H.264
Ayduno: Dolby Digital 2
KaHaJa, C NcNoJIb3ObaHHeM
Dolby Digital Stereo Creator
- I3rOToBJeHo nO JInCeH3nKOMpaHnn Dolby Laboratories.
[Hocntelb3anncn]
SLOT 1/SLOT 2: Cnot Дя кар SD (coBmecTnMbIX C UHS-I n UHS-II)
[Pa3beMbI BBOda/BbIBOda]
Pa3bem USB Type-C: SuperSpeed USB (USB 3.2 Gen 1)
Pa3bem Multi/Micro USB*:
Hi-Speed USB (USB 2.0)
- ПондөрхиBaet Micro USB-
COBMECTNMBIE yCTPOINCTBa.
HDMI: MinkporHe3do HDMITunaD
Pa3beM (MnKpOfoH):
03,5-MM CTepeofoHueckoe
MHHI-THe3IO
Pa3beM (HayshnK):
03,5-MM CTepeofoHueckoe
MHH-ΓHe3dO
Pa3bEm IOKaJIbHOcTeN
Pa3bem $(CnHxpoHuaaBcNbIwKn)
[06uee]
HomHaJIbHbI BxOJ:7,2B-39BT
Pa6oayTemnepaTypa:
OT 0do 40^
Tempepatypxpanen:
OT-20do 55^
Pa3mepbl (L/B/Γ) (npn6Jn3.):
128,9×96,4×77,5MM
128,9×96,4×67,3MM
OT PYKOKTKN DO MOHNTopa)
Macca (npn6n3.):
678 r (ВКлочаakKуЯТор,
Kapty SD)
[BecnpoBODHa loKaIbHa cetb]
WW942051 (cM. 3aBODCKyU T6JIuKUHa HIXKHe CTOpOHe KaMEpbI)
PoeepKnBaembl opMaT:
IEEE 802.11 a/b/g/n/ac
Ponocacactot:2,4T/5T
Be30nacHOCTb:
WEP/WPA-PSK/WPA2-PSK
Cnocob nodkluoyenra:
Wi-Fi Protected SetupTM (WPS)/
BpyHyIO
Cnocobdoctyna:
HΦpaCTpyKTyphblpeXmM
WW485782 (cM. 3aBO,ДСКУTO Ta6ЛИЧКY
Ha HxKHei CTOpOHe KaMepbl)
PonepkNBAeMbIΦopMaT:
IEEE 802.11 b/g/n
Ponocacacto:2,4T
Be3onaCHOCTb:
WEP/WPA-PSK/WPA2-PSK
Cnocob nodklouhenra:
Wi-Fi Protected SetupTM (WPS)/
BpyHy
Cnocobdoctyna:
HΦpaCTpyKtpHybI peKmM
[NFC]
Tun Tera: B COOTBeTCTBUN C
NFC Forum Type 3 Tag
[CoeHHenblaught]
CTaHdapt Bluetooth Bep. 4.1
Ponocacacto:2,4T
3apraHoe yctpoNCTBO BC-QZ1
HomHaJIbHbI BXOd:
100 - 240 B\~, 50/60 _i , 0,38 A
HomHaJIbHbI BbIXoI: 8,4B-1,6A
AkkymyTop NP-FZ100
HomHaJIbHoe HapJxKeHne:7,2B---
KoHcTppykUaI N TexHnueckne
XapakTepcntkMOryT 6bItb
n3MeHeHbI 6e3 yBEdOMJenneHna.
O coBmecTnMoocTn fOpMaTOB n3o6paJxKeHn
-Данная камета COOTBETCTBYET yHnBepcaJIbHOMy cTaNdapTy DCF
(Design rule for Camera File system), yctaHOBJeHHOMy JEITA (Japan
Electronics and Information
Technology Industries Association).
- BocnpoN3BeDeHne n3O6paXeHn, 3aIncAHbIX BaIeN KaMepoN,
Ha npyrom o6OpydoBaHn n Bocnpo3BeDeHne BaWei Kamepoi
n3o6paXeHn, 3aHncAHbIX nJIOTpeJaKtnpOBaHHbIX Ha dpYROM
obopyoBaHn, He rapaHTnpyetc.
Tobaphe 3HaKn
XAVCS XAVCOTCA
3aperntpnpoBaHHbIMN
TOBapHbIMN 3HaKaMn
Sony Corporation.
"AVCHD" n norotun "AVCHD"
YBJIOTCTOBapHbIMN3HaKaMNI
Panasonic Corporation n
Sony Corporation.
Mac yBJIeTcTobapHbIM 3HaKOM
Apple Inc., 3apernctpnpoBaHHbIM B
CoeHHeHHbIX ⅢTaTax AmePKn I dpyrnx CtpaHax.
- iPhone i iPad yBnIOTc
TOBapHbIMN 3HaKaMn Apple Inc.,
3apeTpnpoBaHHbIMN BCLJA n
DpyrnxCTpaHax.
- Blu-ray Disc^TM n Blu-ray™
YBJIOTCTOBapHbIMN3HaKaMn
Blu-ray Disc Association.
Digital Living Network Alliance.
- USB Type-C™ n USB-C™
YBJIOTCTOBapHbIMN3HaKaMn
USB Implementers Forum.
Dolby, Dolby Audio n cnmboJ DBOHoro D yBnIOTc TOBapHb
3HaKaMn KOMpaHn Dolby Laboratories.
- TepMNHyHDMI HDMI High
Definition Multimedia Inter
nIlorotnHDMIyBlaIOTcA
TOBapHbIMN 3HaKaMn NJIIN
3aperntpnpoBaHHbIMN
TOBapHbIMn 3HaKaMn HDMI
Licensing Administrator, Inc. B
CoeHHeHHbIX LItatax n dpynx
CTpaHax.
-
Microsoft Windows JBJIOTc
3apernctpnpoBaHHbIMN
TOBapHbIMN 3HaKaMNIJN
TOBapHbIMN 3HaKaMNI
Microsoft Corporation B
CoeDInHeHHbIX LItaTax AmePKNI/
JINI DpyrNX CtpaHax. -
Логоти SDXC Альяетс Товарным 3нakом SD-3C, LLC.
- Android и Google Play Ялготс Товарныm 3нakам илл зaperпстрироваим Товарным 3нakам Google LLC.
Wi-Fi,lorotn Wi-Fi Ni Wi-Fi Protected Setup yBIAOTc3apeRnCTpnpOBaHHbIMN TOBapHbIMN 3HaKaMn nIIN
TOBAPHbIM 3HaKaAMN Wi-Fi Alliance. MeTka N YABJARETCY TOBAPHbIM 3HaKOM INI 3apeRNCtpnPOBaHHbIM TOBAPHbIM 3HaKOM NFC Forum, Inc. B CoeINHeHHbIX LITatax AmepnK IN B DpyrNX CTPaHax.
-
TekTOBbI CNMBOJ N JLOROTnbl
Bluetooth® YBJIaOTc
3apernctpnpOBaHHbIMN
TOBapHbIMN 3HaKaAMN,
PnHaJeXkaUMM
Bluetooth SIG, Inc. n JIO6oe
NCNoJIb3OBaHHe TaKNX 3HaKOB
Sony Corporation ocuyeCTBnJeTc
no JInueH3nn. -
QR Code яВлЯЕТСТоварнызнakOM Denso Wave Inc.
Kpome TOrO,Ha3BaHnA CNCTeM nI3dJIiN,NCNoJIb3YeMbIe B DaHHOM pyKOBOJCTBe,RAJIaOTcR, O6bUHO,TOBapHbIMN 3HaKaMn IIN 3apeTnpoBaHHbIMN TOBapHBIMN 3HaKaMn INX COOTBETCTByIOx npa3pa6OTuNKOB IIN pON3BOJnteJe.ODHaKO 3HaKn TM IIN 圆 NCNoJIb3YOTcR He BO BCEX CnyaAx B daHHOM pyKOBOJCTBe.
InfoLITHIUM
3 3 CLASS
HOMI
XAVC S
Bluetooth
BIDBeiTppe6pa y HnKniyactnHi HaOuHnKa OkyIpaIIBOpyu i npabOpyu, TaPiHIMITb HaOuHnK.
![SONY Alpha A9 II - [BecnpoBODHa loKaIbHa cetb] - 1](/content/2026/03/483534/images/438d38f6d26917336fa9f5417cd890795abcf6ffe194c8e0b42fa7f5efc7a7da.jpg)
3HIMITb HAOUHK OKyIpa,
RAKIO Tpe6a BCTaHOBNTu KYTOBn BNDOswKaU (npoDaETbcr Okpemo).
Takox Bn6epiTB MENU
2 (HanaTyaH. yHK.3nOM.2) → [FINDER/MONITOR], a todi BBIMKHiTb [BnIoUyKau(PyHn)] a6o [MoHiTop(PyHn)].
2 BnDooykau
3 KhoNka C3 (cneuaJIbHa KHOnka 3)/KHOJaKa 0- (3axnCT)
4 KhoNka MENU (32)
5 MoHITOp (dЯceHcOphoro KepyBaHHa: cHcOpha naHeIb/Taunad) MoHITop moXHa BCTaHOBHTn Pid Notpi6Hm Kytom, 0o6 6ylo KpaSe BnDHO Ta MOxHa 6ylo 3HiMaTn 3 6yDb-koTO NOLOXeHHa.
![SONY Alpha A9 II - [BecnpoBODHa loKaIbHa cetb] - 2](/content/2026/03/483534/images/ad1bba781fdf3c8f7e51b5f6fdb7e1b1ed091db1b524948fd8dc549b041b4771.jpg)
6 CeHcop OKa
7ДиckHaJaTuBaHnIoiNTpii PeryIIOIte DnCK HalaStuBaHHaioNTpii BiIOBIDHO DO CBOTO 30py, NOKI 3O6paJKeHHaY BINOUsyKaUHe CTaHe YITKIM. JKsoDnCK HaJaSTuBaHHaIOPTpiOBepTaTn BaXko, 3HIMtB HaOuHnK OkjIpa i BiDpeYJIIOTe DnCK.
![SONY Alpha A9 II - [BecnpoBODHa loKaIbHa cetb] - 3](/content/2026/03/483534/images/01946988a3e0f0a11dc2ed9b8f78dcd03d86b625dc3505d8d05b0fd5287345c9.jpg)
8 KhoNka MOVIE (Bideo3nOMka) (27)
9ДЯЗИOMK:KHONKa AF-ON (AFYBIMK) ⅡЯпергяду:KHONka (36iIbI.306paJk.)
10ДлЯЗИOMКN:KHOнkaAELДлЯпергяду:KHOнka(Индекс30брахкeнь)
11 MyJIbTnCeJIeKTop
12ДлЯЗИOMК:KNONKaFn (Функця) ⅡIЯпергеляу:KNONKa (Hadicn. Na cmapTΦ.) ⅡIЯВIDOBpaXeHHeKpaHa [Hadicn. Na cmapTΦ.] HATNCKaIte zu KHOKNy.
13ДиСК КерУВаHHЯ
14 IIndnkaTopdoctyny
15ДЯЗИOMK:KHONKaC4 (cneuaJIbHa KHONKa 4) IЯпергяу:KHONKa (BndaIHTn) (27)
16 KhoNka BiTBopeHn) (27)
Bud 3ropn
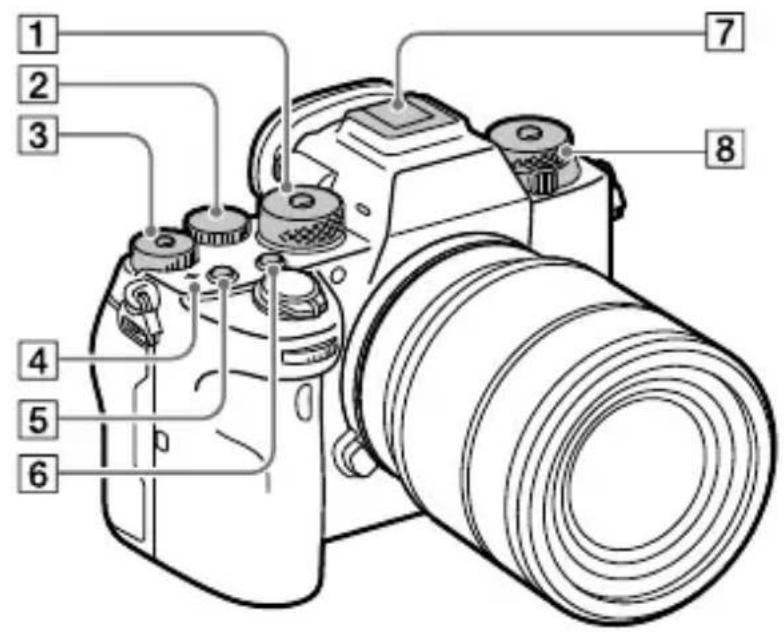
9 IIndnkaTOp 3apJxKaHHa
10 Rauchn dIy IJIeOBOrO peMeHr PnKpiniTb 6uIbA KInci peMeHr Do foToa npaTa.
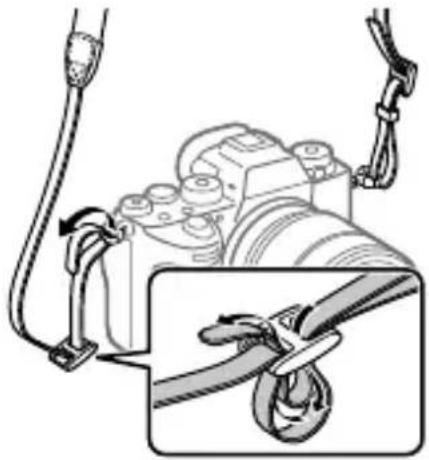
11 03Ha4ka N) (28)
https://rd1.sony.net/help/di/ftp/h_zz/

- Notpi6hi 6a30bi 3HaHHn npo FTP-cepBepn.
UA
3haomctbo 3 npoqpaHnM 3a6e3neueHHaM
Mn haiaeMo habeJeHe nporpaHne 3a6e3neueHH nIiBnueHH BaWoRo 3aIOBOJehnB iD fOToRpaΦyBaHnH i BiDeo3NOMKn. 3a DonomoroIO iHTepHeT-6pay3epa BIDiDaIte OndHy i3 HabeJeHX URLaDpeC, Ta 3aBaHTaXTe nporpaHne 3a6e3neueHH, DOTpIMyUOuNCb IHCTpyKci Ha ekpaHI.
Якшо одна i3 сих поррам Вже BCTaHOBJIeHa Ha KOMn'HTepi, nepeДВИКОРиСТаHHЯМ OHOBIt b II Do OCTaHHboI BepciI.
Дokлади BiIDOMOCTI по КOMN'IOTePHe ПрогамHe 3a6e3neueHЯ ДиВITbCS 3a TaKOJO URL-aDpecoJO: https://www.sony.net/disoft/
IpebeipuTn peKoMeHDoBaHe po6Oue cepeOBoUe dJa npOrpaMHO 3a6e3neuHnMa MoXHa 3a TaKOU URL-aDpecoU:
https://www.sony.net/pcenv/
Imaging Edge
Imaging Edge — ue komnneKT nporpaHoro 3a6e3neueHH, lo miCTntb Taki fynkui, k-OT 3iOMka 3a dONOMOIO dinCTaHciHoro KepyBaHH 3 KOMn'IoTepa, KopnryBaHHy uI peaYBaHHra 3po6JIeHHx foToaapanapatom 3o6paXeHb fOpMaTy RAW.
Дokлади Вдомостi по Imaging Edge ДИВiTбя за takою URL-aДресю: https://www.sony.net/iex/
PlayMemories Home
Iporpama PlayMemories Home do3BolЯ e imnoptybatn foToorpaΦi
Ta BiDeo3aIncn Ha KOMN'IOTeP, De ix MoXHa nepeTJdaTn a6o
BVKOPNCTOBYBaTN iHJIM M UHHOM.
Для IMnopтуваня Biideo XAVC S a6o AVCHD Ha komп'ютepi Heo6xidno BCTaHOBHTn nporpamy PlayMemories Home.
IpeeTnHaBe6-caT3aBaHTaxKeHHaMOXHa 6e3nocepEnb0 3 TaKoi
URL-aDpecn:
https://www.sony.net/pm/
https://support.d-imaging.sony.co.jp/app/remotecameratool/l/index.php
UA
2 HaTnCKaITe BepXHi, HxKHi, IiBni a6o npaBn Kpa dNcKa KepyBaHnY qN o6ePaTte DnCK KepyBaHHa, 06 Bn6paTn NapamTp, kN Tpe6a HaJaSTyBaTn, a ToDi HaTnCHiTb NocepeDnHi DnCKa KepyBaHHa.
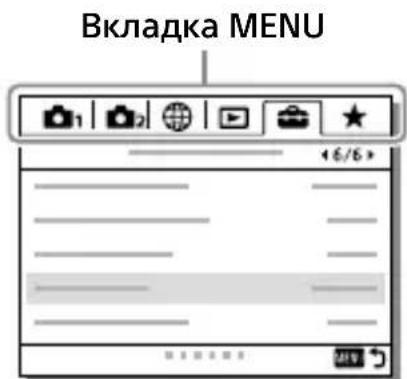
- Дяпеседу до iнwoi BKладк MENU виберіть BKладкY MENU BGopi ekpaHa НатисiTь ЛИВ/Nрави Край ДИСКа КерУвань.
- Д�� поху до сиwoь BKладк MEnU moxha obepTaTи nepeHi NICK.
- Дяпеседу до Habтунhoi BKlaДк MENU haTnchitb KHonky Fn.
- Βοδ πονερήτις ὅ ποηρεπHBOrO εκρaHa, ḀτιςχΙΤό ΚΗΝΚγ MΕΝΥ.
3 Bn6epiB noTpBi6He 3NaueHnI iHaTnCHiTB nOcepeDnHi dIy niTBePdJxEHHa.
Пдka3ka
- Дя вдкрвань ekpaHa MeHIO npn3NaHTe Функцio [MENU] cneцiaJIbHiKHOJI 3a DoIOMOrOIO [KJ.KOpNCT.] a6o [KJ.KOpNCT.], a ToDi HATNCiTbBIVbpaHy KHOJIky.
8.7M 6.9M 6.0M 5.3M 5.1M
4.0M 2.6M 2.3M 2.2M 1.7M
Pozmp 306paXeHHaI
ΦoTOrpaΦi
RAW RAW
3nOMka y φopmati RAW
(CTNCHyTN/He CTNCHyTN)
X.FINE FINE STD
Rkictb JPEG
XAVCS4K XAVCSHD AVCHD
ΦopMaT ΦauiB BiJeO
100 60 50 25 16
FX FH
Iapametpn BiJeO3nOMKn
120p 60p 60i 30p 24p
100p 50p 50i 25p
Yactota 3miHn BideokapipB
100 60 50 25Px
16Px
3annc npokci
120fps 60fps 30fps 15fps 8fps 4fps
100fps 50fps 25fps 12fps 6fps
3fps 2fps 1fps
Yactota Kaipib Jnra 3nOMKn B ynoBilbHeHomy/npnCKopeHomy peKmI

APS-C/Super 35mm

3apnkaetbca cnaax
VIEW
Biö6.HaJauB. BIMK

IiCbiuyBaHHA
Flicker
PomiuHc6JImaHHa

BumK./yBIM. SteadyShot,
nonepedxeknna pno TpeMTiHnna foToanapata

Φok. BičT. SteadyS./
PonepeJxKeHH npo TpeMTiHHn foToanapata

Po3ymHeMacuTa6yBaHHra/
Macwt.uitk.306p./LnΦpoBe MacwTa6yBaHHa

IiD yac BiJeO3HOMKn 3ByK He 3aHNCyETbCra

3meHw. wymy bitpy

3annc iHopmaui npo aBtopcbki npaba
IPTC
3annc iHopmaui IPTC

CkacyBaTnΦokyc

CkacyBaH. BiDCTeXeHHN
ToukOBmΦOKyc
BnKoHaHHaYHKuii
[TouKOBnΦOKyc]

AKTINBOBaHO NFC (28)

ПидклоченьBluetooth
DocTyHe /PiKnIoueHHa
Bluetooth HeIoocTynHe

PiKJIoueHo Do CmapTfoHa / He PiKJIoueHo Do CmapTfoHa

OTpMaHHIhOpMaJI npo
Micce3haxoJKeHH/ IHopmaioI npo Micce3haxoJKeHH
OTpIMaTn HEMOXJINBO

Pexim noIbOToY

PonepeJxKeHHnI npo neperpivAHnH

Фаил 6a3n ДaHnx 3aNoBHeHo/ ПомИнka Фаиу 6a3n ДaHnx
3 BaTapea

3aIIuKOBn 3apJd 6aTapei (18)

PonepeJxehn npo Hn3bKn 3apd 6aTapei

KINBJIeHnY uepe3 USB
4 HanaTuBaHn3IOMKn
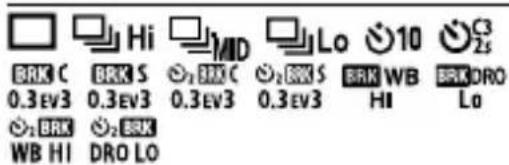
Pekim npotraHHa

Pekim cnaJaxy /
BezdpoToB.cnaJax/
3MeH.eΦ.uepB.oueN
UA
±0.0
Kopeku.ekcn.cnaI.

PexnM fokycBaH.
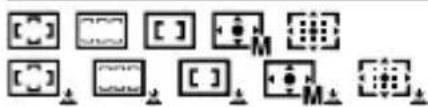
06n.foKycyBaHHa
UA
JPEG RAWRAW+J +J RAWΦopmat Φaɪna
Pekim Bumipy
AWB AWB AWB 燥-1 燥0 燥+1 燥+2 WB
7500K A5 G5
BaIaHc 6IIOr (aBtOMaTnUHe HaJIaSTyBaHHra, NOpEpeHbO BCTaHOBJIeH eHaJIaSTyBaHHra, aBTOMaTnUHe NiD BOIOH, CneuaJIbHe HaJIaSTyBaHHra, KOJIiPHa TempepaTypa, KOIipHni fIbTp)
D-R DRO HDRO 000 AUTO AUTO
OnTm3. D-iana3./ABTO HDR

$$ + 3 + 3 + 3 $$
TbOpn CTnIb/KoHTpaCTHiCTb, HacnueHICTb, YITKICTb

EΦeKrMaJIOnHka
[ON]
Приор.обл./очай AF
目目目AUTO MECH ELEC
Tn3atbopa
1 2
Ppiop. Hocia 3aanncy
5 IIndnkaTop oKycBaHHaHaJaTuBaHHeKcNo3u
()
INnKaTOp OKycBaHHa
1/250
Bntpumka
F3.5
3HaueHHiaaeparmn
图
Kopekzi ékno3nii/ EKcnohyBaHHaBpyHy
ISO400 ISO AUTO ISO400
UyTnnBictb ISO
AWB
БлOKуВангАE/6лOKуВангFEL/6лOKуВангAWB
6 HapymHi/Inhe
CKacyBaH. BIDCTeXeHHa
BiodopaXeHHIOBiknIbI BIDCTeXeHH
CKacyBaTN φokyc
BiodopaXeHHIobIKnIJIckacyBaHHaOKycbAHH
ISO
PnKpInHeHa roIocBa HOTaTka
2 HanaHTyBaHHa fOToanapata
ДиВ.po3ДЛ«ПiktOrpamnHa ekpaHi 3NOMKn》(CTop.33).
3 HanaHTyBaHHa 3HOMKn

[EleKtpoHnBnDoWykau]
Tn: eJektpoHn BnOwkyKaU 1,3 cm (Tn0,5)
3araIbHa KIlbKicTb TOOK: 3686400TOOk
36iNbWeHn: npu6J. 0,78x 3 06'KtNBOM 50 MM Ha 6e3KiHeuHicTb, -1 M-
Tocka orJy (Touka 3naXoJKeHnOka): npn6JI.23 MM BiD Okylpa, npn6JI.18,5 MM BiD paMKn Okylpa npn-1 m
HanaWtYBaHHaIionTpIi:BID-4,0M1D0+3,0M1
[Mohitop]
Cenccopa naneB, TFT 7,5 cm (Tn3,0) 3araIbHa KJIbKICTb TocOK: 1440 000 TOcOK
[KepyBaHHaekcno3nciio]
MeToD BmIpOBAHH eKcNo3nui: 1200-3oHaJIbHe OciHIOBaJIbHe BmIpOBAHHa
ДIANa3OH yUrTInBocTi: BiД -3 EV Do +20 EV (3a eKBiBaJIeHTa ISO 100, 3 06'KtINBOM F2.0)
UytTnBicTB ISO (peKoMeHDoBaHn iHdEKC eKcno3nui):
OToIrpaaii: BiD ISO 100 do
ISO 51 200 (36iJIbWeHn DiaHa3OH
ISO:Minimym ISO 50, maKcImym
ISO 204 800)
BiJeO:3a ekBbaleHtA BiD ISO 100
do ISO 51 200 (36iJIbWeHn
Diapaoh ISO:Minimym ISO 100, MaKcImym ISO 102 400)
[3aTBop]
Tn: 3 eJektpoHnM KepyBaHHaM, BepTKaJIbHOrO XOdy, UToPHO- UIINHHOrO Tnny
Дiana30H BnTpMKn:ФOTOrpaΦii (niD qac 3HOMKn 3BnKOpNCTaHHm eJeKTpoHNO3aTBopa):Bi1/32000cekyHn*do30cekyHn(1o1/8cekyHnPiJqac6e3pepePBHOI 3HOMKn) * DocTyHNO JnWe y peKImaxM (ekCno3nizia BpyHy) TaS (piopntet BVTPMkn).DeTaIbHo YHTaTe B «IOBikKa').ΦOTOrpaΦii (niD qac 3HOMKn 3BnKOpNCTaHHm MexaHicHoro3aTBopa):Bi1/8000cekyHn do 30cekyHn, BULBBiJeO3HOMka:Bid1/8000cekyHnDo 1/4cekyHn
Pnictpoi 3 nItpmkoIO peKIMy
1080 60i (npncpo3 niTpnmkoio
pekmy 1080 50i):do 1/60 (1/50)
cekyHn y peKmMi AUTO (do
1/30 (1/25) sekyHdnypekmi
abTOMaTnUHoiI IOBROI BntpumKn)
WBnKicTB cHxpoHi3auii 3i
cπaλaxom: 1/250 cekyHπ (y
pa3i BnKOpncTaHHcnaJaxy
Bnpo6HnTbA Sony)
[ΦopMaT 3HOMKn]
ΦopMaT ΦaNJy: cymichi 3 JPEG
(DCF Ver. 2.0, Exif Ver. 2.31, MPF
Baseline), RAW (φopmat Sony ARW 2.3)
BiJeO (ΦopMaT XAVC S): cyMiChIcTh
i3ΦopMaTOM MPEG-4AVC/H.264
XAVC S Ver.1.0
BiJeo:MPEG-4AVC/H.264
3Byk: 2-kaHaJIbHnLPCM (48 KΓι
16-6iTHn)
Biéo (ΦopMaT AVCHD):
Cymichn i3 opmatom AVCHD
Ver. 2.0
BiJeo:MPEG-4AVC/H.264
3Byk: 2-kaHaJIbHn Dolby Digital 3
Dolby Digital Stereo Creator
CTBOpEno no JIuceH3iKOMnHaHii
Dolby Laboratories.
[Hocii daHnx]
SLOT 1/SLOT 2: rHizdo nla kapt SD
(cymichictb 3i CTaHndapTaMn UHS-I
Ta UHS-II)
[Bxidi/BnxiDi po3'Em]
Po3'EM USB Type-C: SuperSpeed USB
(USB 3.2 Gen 1)
Po3'EM Multi/Micro USB*:
Hi-Speed USB (USB 2.0)
*PiItpmMyIObC npncTpoi,
cymichi 3 po3'emom Micro USB.
HDMI: mikpopo3'€m HDMI Tuny D
Po3'EM (mikpofoH):
03,5 MM Ctepeo MiHi-po3'EM
Po3'EM,(HabyuHnKn):
03,5 MM ctepeo mHi-po3'EM
Po3'EM IOKaJIbHOI Mepexi
Po3'EM (cHxpoHizai 3i cnaJaxom)
[3aŋbhi BIDOMOCTi]
HomHaJIbHa BxIDHa NOTyXHICTb:
7,2B 3,9BT
Pobova TemnepaTypa:
BiiD Odo 40°C
Tempepatya 36epirahnra:
BiD-20do55°C
Pozmipn (LJ/B/Γ) (np6π):
128,9×96,4×77,5MM
128,9×96,4×67,3MM
(BiDpyuKNoMOHiTopa)
Maca (npn6n.):
678 r (3 6aTaapeiO Ta KapToIO SD)
[Be3dpoTOba loKaJIbHa MepeXa]
PiTpmyBaHn oOpMaT:
IEEE 802.11 a/b/g/n/ac
YacToTHn diana3oH: 2,4 Tg/5 Tg
Бeзnéka: WEP/WPA-PSK/WPA2-PSK
Cnoci6 niDKJIIOUeHHa:
Wi-Fi Protected SetupTM (WPS)/
BpyHy
CnociDocTyny:peKIM
iHpactpykTpyn
[NFC]
Tun teriB: cymichictb i3
NFC Forum Type 3 Tag
[3B'30k\text{Bluetooth}]
CTaHdapt Bluetooth Ver. 4.1
YactoTHn diana3OH:2,4T
3apaHn npncptpi BC-QZ1
HomHaBbHbXiDHa NotyXhIcTb:
100 - 240 B ~, 50/60 Φ, 0,38 A
HomHaBbBa BnXiIHa nOTyXHcTb:
8,4B 1,6A
Akymyntop NP-FZ100
HomHaJIbHa Hanpyra: 7,2 B-
KOHCTpykciTaTexHiHi
XapakTePncTnKMOxTyb
3MiHIOBaTnC8e3 NOBIOMJeHHra.
Ipo cymichictb daHnx 306paXeHb
- Βeɪ φοτοapanapat Biɪnəbiæ
yHiBepcaIbHOMy cTaNdapTy DCF
(Design rule for Camera File system),
Bn3NaueHomy aocuaie JO JEITA
(Japan Electronics and Information
Technology Industries Association).
BidTBOpENHa 306paXKeHb, 3HrTINX
3a donomoroo zbofo fotoanapata,
Ha iHwomy o6naHaHHi, a TaKoX
BIDTBOPeHHaTOanapaTOM
306paXeHb, 3a\PucaHx a6o
BidpepaobahnxHa iHwomy
O6JaHaHHi, He rapaHTyETbcra.
Tobaphi 3HaKn
XAVCS XAVC S
3apeecTpoBaHmN TOBapHmN 3HaKaMn Sony Corporation.
Corporation Ta Sony Corporation.
Mac e ToBapHm 3HaKOM Kopnopauii Apple Inc.,
3apeecctpobAHm y CnoJyueHnx
UtaTax Ta iHUnx KpaIHax.
- iPhone ta iPad ∈ Товарнин.
3HaKaMn KOpnpauii Apple Inc.,
3apeeCTpoBaHmB CUSA Ta iHux
KpaɪHax.
- Blu-ray Disc^TM Ta Blu-ray™
€ TOBAPHIMN 3HaKaAMN
Blu-ray Disc Association.
Digital Living Network Alliance.
- USB Type-C™ Ta USB-C™
€ TOBAPHIMN 3HaKaAMN
USB Implementers Forum.
Dolby, Dolby Audio Ta em6JIema
3 NOBIMN“D”-TOPROBEJIbHi
Mapkin Kompani Dolby Laboratories.
- HDMI, HDMI High-Definition
Multimedia Interface Ta Iorotun HDMI e ToproBbHmN
Mapkamna 3apeeCTpoBaHnMn
ToproBebbHmMn Mapkamn HDMI
Licensing Administrator, Inc. B CLJA
Ta iHwix KpaHax.
Microsoft Ta Windows e
3apeCCTpOBaHIMTOBapHIMN
3HaKaMn a60 TOBapHmN 3HaKaMaN
Microsoft Corporation y CLJIA Ta/
a6o iHunx KpaHax.
-Логотин SDXC∈Товар hum 3HaKOM
SD-3C, LLC.
Android i Google Play ∈ ToBapHnMn
3HaKaMn a6o 3apeeCTpoBaHmMn
TOBAPHIMN 3HaKaAMn Google LLC.
Wi-Fi, Iorotn Wi-Fi Ta Wi-Fi Protected Setup € 3apeeCTpOBaHIMN TOBAPHMN 3HaKaMn a60 TOBAPHMN 3HaKaMn Wi-Fi Alliance.
-Позначкa N E TOВарнIM 3HaKOM a60 3apeeCTpoBaHIM TOBapHIM 3HaKOM NFC Forum, Inc. y CIIA ta iHnIX KpaIHax.
CIOBecnTOBAPHn3HaKa TaIorotnbluTooth 3apecTpoBaHmN TOBAPHMn 3HaKaMn,IO HaJExKaTb Bluetooth SIG,Inc.,i6yDb-jaKe BIKOPNCaHHaTaKNX 3HaKiB KOMpaHieO Sony Corporation 3diINCHoETbcra 3aJIueH3iEIO.
- QR Code € TOBAPHM 3HaKOM Denso Wave Inc.
KpIM TOrO,Ha3Bn CnCTeM Ta BInpo6iB,aki BNkOpNCTOBYOTbcy U cIbOMy nocihky, k npabNIO, E TOBapHmN 3HaKaMn a6o 3apeCtpoBaHmN TOBapHmN 3HaKaMn BiINOBiIDHnx PO3po6HKnIB Ch BInpo6HKnIB. Ipote 3HaKn TM Ta MOKyTB BNkOpNCTOByBaTncr B cIbOMy nocihky He Bycix BUnpaKax.


Bluetooth
Ipro npnklaadne nporpaMHe 3a6e3neueHnra GNU GPL/LGPL
Bupi6 BnKOpncToBye npoRpaMHe 3a6e3neueHnHaJaKe p03noBcIOJxkyETbcGNU General Public License (daIyTeKci- 一 _ 一 GPL)a6o GNU Lesser General Public License (daIyTeKci- 一 LGPL).
Ue 03haa, 3a yMOBAMn
JIueh3iGPL/LGPL, kI OdaIObCra,
KOpNCTyBaH MaE npaBO Ha DOCTyn,
3MiHN I NOaJIbWe PO3NOBCIOJKeHHA
BHXiDHorO KoDy cNX npoRpaM.
BHXiDNHKOd DOCTyHnB lHTepHeTi.
Uo6 NOrO 3aBAHTaXHTn,
cKOpNCaTae TakoU URL-aDpeco:
http://oss.sony.net/Products/Linux/
PpocmO KopNCTyBaiv He
3BePTaTncrdo Hac CTOCOBHO BMICTy
BHXiDHorO KoDy.
Tektn liueh3i (aHrniCbKOIO MOBOO) 36epeKeHO y BHyTpIshHi nam'rai Bnpo6y. Oo6 o3HaNoMTncra i3 liueh3iAmBnanzi «PMHOME» - «LICENSE», BcTaHOBITb NiKJIuOeHHa Bnpo6y Do KOMN'IOTepa JK 3OBHIshHbOro 3anam'ЯTOBYUOOro npicTPOIO.
IodatkoBy IHOpMauiO CTOCOBHO 乌BOBPObO6y Ta BiNObiDi Ha TInoBI 3aINTaHH MoKHa 3HaHTn Ha Be6- CaTl Cnyk6n NiITpIMKn CNOXNBauIB KOMNaHII Sony.
https://www.sony.net/
Titta i Hjalpguiden!

https://rd1.sony.net/help/di/ftp/h_zz/

https://rd1.sony.net/help/di/ftp/h_zz/

Aani: LPCM 2ch (48 kHz 16-bit)
Video (AVCHD-muoto):
AVCHD-muoto versio 2.0
-yhteensopiva
Video: MPEG-4 AVC/H.264
Wi-Fi Protected SetupTM (WPS)/
manuaalinen
https://rd1.sony.net/help/di/ftp/h_zz/

https://support.d-imaging.sony.co.jp/app/remotecameratool/l/index.php
NO
Bruke MENU-elementer
https://rd1.sony.net/help/ilc/1960/h_zz/
For at slette det viste billed
https://rd1.sony.net/help/di/ftp/h_zz/

https://support.d-imaging.sony.co.jp/app/remotecamera tool/l/index.php
Nominal spaending: 7,2 V ---